Archive | appetizers RSS feed for this section

Chicharritas de Plátano

15 Aug

While I was in Miami, I got the opportunity to make a true Latin specialty – Chicharritas de Plátano.  This is the way I call them when I am in Miami, because in Puerto Rico these are called Platanutres.  They’re exactly the same, people just call them differently, the same way some people say elevator and others say lift… you get my drift.

But not only these are called differently by Cubans and Puerto Ricans, they’re eaten somewhat differently too.  Puerto Ricans eat platanutres mainly as a snack or maybe even as a side to sandwiches.  However, Cubans eat these little fried slices of plantain as an appetizer, a snack or sometimes even as a crispy side dish to accompany rice and black beans.  Also, they like to serve these with a drizzle of mojito criollo, just like the one I showed you to eat with your boiled yucca, without the onions – just olive oil, garlic , salt and lemon juice.  This is my favorite appetizer in any Cuban restaurant in Miami… and Cuban restaurants in Puerto Rico do not have them.  It’s a Miami thing and I LOOOOOOOOVE it!!

You can get chicharritas bagged, just like potato chips.  I have even talked to you about them in our posts on Junk Food, but the freshly made ones are special.   My aunt Gladys, being the “alcahueta” she is, made me some chicharritas before us leaving Miami.  I wanted to go to a restaurant, but she insisted and I took pictures. 


CHICHARRITAS DE PLÁTANO

2 green plantains
Kosher salt
Canola oil to fry them in


  1. Start by peeling the plantain.  Remember to peel them carefully using an oiled knife to avoid staining your knife.
  2. Slice the plantain very thinly using a slicer or a mandoline.  My aunt uses this nifty slicer.  You can slice it in small rounds, which is the traditional way and the way we did them this time around.  In restaurants you usually see the chips sliced the long side of the plantain.  The choice is yours.
  3. Separate and salt the plantain slices.  I always thought the salt was added after frying, but in fact, I like the taste when they’re salted beforehand.
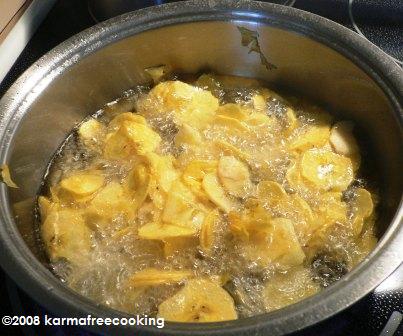
  4. Bring about an inch of oil to frying temperature in a medium sized pot – about 350° F.  To tell you the truth, I never take the oil’s temperature.  Use the wooden spoon method if you want to be sure.
  5. Drop the plantain slices in small batches and try to separate them as much as possible.  Slices will want to stick together. So try to keep the separate.  Fry them until they’re golden.  Keep an eye on them because they go from perfect to burn easily.
  6. Take them out with a slotted spoon and drain in a paper towel.


Enjoy alone, with mojito criollo or as a side dish – I ate them with black beans and rice and slices of avocado on the side.  I love my aunt’s cooking!!!!!

Guacamole

13 Aug

I just came back from a few days visiting my family in Miami.  And in Miami, just like in Puerto Rico, people sell produce at the street lights.  A few days back we bought 4 avocados for $5.  Amazing…  because they were all good avocados.  Sometimes when they sell them to you that cheap is because they’re not so good on the inside.  And with avocados, it’s a crap shoot.  Sometimes you get lucky and sometimes you need to throw a whole avocado away.

I said they were all good, but some were too ripe and they were smashed underneath the skin next to the ones that were still under-ripe.  And that only left me one alternative to enjoy them – make an awesome Guacamole.


GUACAMOLE

1 avocado, if the flesh is firm, cut into small pieces
½ large tomato, peeled and finely diced
¼ medium onion, finely diced
The juice of 1 criollo lemon or lime
A drizzle of olive oil – about 1 tbs
Salt and Pepper to taste
2 tbs of fresh parsley (optional)


  1. Mix everything in a medium sized bowl.
  2. Let it stand in the fridge for a few hours so the flavors meld together. 


This version ended up being more mashed than what I usually like it.  But remember we started out with mashed avocados.   When I make it again, I post another picture so you can see the difference in texture.  And That’s really the only difference because the taste is equally delicious.

Mushroom-Stuffed Mushrooms

2 Aug

This is a variation on Stuffed Mushrooms… to me it was a no-brainer that you can use the stems of the mushrooms and used them as your filling.  But people were sooooooo amused by this that it let to the name – mushroom-stuffed mushrooms.  This is basically using up all your produce and minimizing waste.

I made these as hot appetizers for our Francophone get-together, but you can serve them as a side dish too.  My friends teased me on the concept, but they all took home the left-overs.  And still, 5 days later they were still bragging about them.  Not bad, huh?


MUSHROOM-STUFFED MUSHROOMS

1 packet of button mushrooms
2oz cream cheese
2 handfuls of grated cheese – Italian-blend
1 tbs of fresh flat-leaf parsley, chopped finely
2 tbs of butter
Salt and pepper
Herbamare seasoning
2 tbs of whole-wheat bread crumbs (optional)


  1. Clean out all the mushrooms and remove their stems.  Set mushrooms caps aside.
  2. In a large skillet over medium heat, place butter and let it brown a bit, about 4-5 minutes.   Meanwhile, chop all the mushrooms stems as finely as possible.  Add the chopped mushrooms to the butter and sauté until the mushroom stems are golden brown.  When they’re almost done… add salt, pepper and Herbamare seasoning.
  3. Pre-heat oven to 400° F.
  4. Transfer the cooked mushrooms to a bowl and add the cream cheese, shredded cheese, parsley and breadcrumbs, if adding.
  5. Stuff each mushroom cap with the filling, allowing the filling to kind-of-overflow.
  6. Bake in oven for about 20 minutes.
  7. Remove them immediately from the oven so they do not sit on the juice they released.   Transfer them to a platter and serve immediately.

Sun-dried Tomato and Roasted Garlic Breadsticks

31 Jul

This is another version of breadsticks… this was kind of an experiment in the sense that I wanted to create a French version of a breadstick but was drawing a blank.

What I did was to take ingredients that were already in my fridge and put them all together.  The results??  Les Francophones loved them!!!!  Noreniel even took the entire leftover breadsticks batch home with him.  He said they would be perfect in his toaster oven…  I totally agreed.


SUN-DRIED TOMATO AND ROASTED GARLIC BREADSTICKS

1 tub of refrigerated whole-wheat breadsticks dough – I use Pillsbury brand
3-4  roasted garlic cloves, mashed
2-3 tbs of Sun-dried Tomato Jam
2 tbs Parmesan Cheese
Salt and Pepper


  1. Pre-heat oven to 350° F.
  2. Take the breadstick dough and lay it flat on a cutting board.  Sprinkle with salt and pepper liberally.
  3. Take the mashed garlic and spread it all across the dough.  Do the same with the sun-dried tomato jam.  Sprinkle the parmesan cheese on top of the garlic/tomato and pat it all down to make the cheese stick as much as possible.
  4. Separate the pre-cut dough of breadsticks and twist them And place them on a baking sheet sprayed with canola spray (I always forget this step… please do as I say and not as I do).
  5. Bake them in oven according to package directions… but I never read the directions, so I always check them after 10 minutes.  They take between 10-15 minutes, until they’re nice and puffed and golden brown.  They will smell delicious too…


French Onion Soup

30 Jul

For our Les Francophones get-together I wanted to make a French Onion Soup…  for 2 reasons: 

  1. I’ve been wanting to try it for a long time now, and
  2. I’ve witnessed how my fellow Francophones ordered Onion Soup in every French restaurant we visited… so I wanted true onion soup lovers to try out my vegetarian version.

I took inspiration from the Barefoot Contessa book from Ina Garten.


FRENCH ONION SOUP with GRUYERE CROUTONS

6-7 medium yellow onions, sliced
4 tbs of butter
1 tbs olive oil
1 bay leaf
½ cup sherry vinegar
½ cup white balsamic vinegar
8 cups of Roasted Vegetable Stock
Kosher Salt
Freshly Cracked Black Pepper
1 whole wheat baguette
½ cup grated Gruyere cheese


  1. In the largest stock pot you have, sauté the onions, butter, olive oil and bay leaf for 20-30 minutes, until the onions are a nice light brown color.
  2. Deglaze the pot with the sherry and white balsamic vinegars and simmer uncovered for 10 minutes.
  3. Add the vegetable stock, salt and pepper.  Bring to a boil and then reduce to a simmer uncovered for 30 minutes.
  4. Remove the bay leaf and check to see if you need to adjust the seasonings.


You can make this soup before your guests arrive and it will keep warm for several hours.

Before serving the soup…

  1. Slice the baguette in ½” slices; drizzle with a bit of olive oil.  Sprinkle with some salt and pepper and place a mound of grated gruyere cheese on top.
  2. Place in a 350° F oven until the croutons toast and the cheese melts and creates a nice brown crust.
  3. Serve the crouton dunked in the soup.


The veredict???  Les Francophones loved it.  It’s a sure-fire hit!!!  Bien sûr.