Tag Archives: lemon

Vegan Spanokopita

8 Oct

I love Greek food… and every time I visit my sister we always order from this little Greek restaurant next to her place.  I loooove to order myself a Stuffed Pita Sandwich made with Greek Salad inside.  It’s so delicious I even crave it as soon as I book my flight to FL.

For a while, my sister avoided dairy… and she loves to eat the spanakopita triangles at the Greek restaurant I mentioned above.  So as the big sister, I decided to make her some spanakopitas she could actually enjoy without the side-effects dairy was bringing her for a while.

Here’s my take on cheese-free vegan spanakopitas…


Recipe from KarmaFree Cooking

DAIRY-FREE VEGAN SPANAKOPITAS

1 packet of whole wheat phyllo dough – 16 sheets

1 ½ packets frozen spinach, defrosted and squeezed dry

1 container Tofutti Better than Cream Cheese

½ container Tofutti Better than Sour Cream

½ container Tofutti Better than Ricotta

2 yellow lemons – zest and juice

1 sweet onion, chopped finely

½ cup fresh flat leaf parsley, chopped

½ cup fresh basil, chopped

1 tbs Kosher Salt

½ tbs Pepper

About ½ cup Olive Oil, divided

  1. In a large bowl combine the spinach, onions, cream cheese, sour cream and ricotta, parsley, basil and a drizzle of olive oil.  Add the zest of the 2 lemons and follow adding the juice, making sure you avoid getting lemon seeds in the mix.   Season generously with salt, pepper and garlic powder.  Combine well and set aside.
  2. To prepare working with phyllo dough I first gather 2 clean kitchen towels and I get them wet and squeeze them dry so now they’re thoroughly damp.  One will be to cover the unused phyllo sheets and the other one to cover the spanakopita pockets after they’re aseembled but before we bake or pack them.
  3. Now that you have your damp cloths or towels, we gather our phyllo dough, olive oil and a teaspoon – the one you eat with, not the one you use to measure recipes.  I work on a large cutting board…  Place one sheet of phyllo dough on the board.  Make sure you cover the unused phyllo sheets with one of the damp towels.  These will maintain them pliable and ready to work with.  If not, they’ll dry out and turn brittle and will be very difficult to work with in this recipe.
  4. Drizzle in a squiggly fashion a teaspoon of olive oil over the phyllo sheet.  Using the teaspoon kinda spread the squiggle trail you made…  Carefully, overlap a second sheet of phyllo right on top of the first one.  Drizzle a very thin stream of olive oil in the same squiggly fashion but on the opposite direction.  For example, the first squiggle you went from left to right.  Now the second one, go top to bottom in front of you.
  5. Using a sharp knife or a pizza cutter, cut the phyllo sheet stack you just created into 4 sections or strips.  I cut halfway and then I cut each half in half again.  This doesn’t have to be exact, although you can certainly use a ruler to measure this.
  6. Now, add about a tablespoon of spinach filling and place in the bottom section of one of the phyllo strips, leaving about 1 inch of phyllo below where you place the spinach.  Fold this bottom part of phyllo over the spinach kinda like folding a letter.
  7. Now fold the sides of the phyllo strip inside, kinda like the way you fold in a burrito.  Now, fold the section where the spinach is enclosed onto itself until a small rectangular package is formed.
  8. Place spinach pockets in a baking sheet and cover with damp cloth as you go preparing the rest of the spanakopita pockets.  You should end up with about 32 pockets  over all.  You could also stack up 3 sheets of phyllo to make it even flakier.  Use the same method, you’ll just end up with 20 finished spanakopita pockets overall.

Now… you can either bake them or freeze them.  If you decide to freeze them, just place them in freezer zipper bags in layers separating each layer using parchment paper r even waxed paper.  They will keep in the freezer for a while, and are very convenient.

  1. To bake them…  just turn the oven to 375F and place the spanakopita pockets in a baking sheet that has been sprayed with olive oil spray.  Place them in a single layer and spray once again over the top with a light spray of olive oil spray.  Bake in oven for about 12-15 minutes until they turn golden brown.  Sometimes, I just turn off the oven and leave them there to make sure the filling is nice and cooked when I take them out.

Wait a bit to bite into them because the filling will be H-O-T!!!!

These pockets are a tad larger that the triangles I am used to make.   These are more fitting for a light lunch or even a light dinner.  I bake myself 2-3 of these with a salad.

My sister thought they were delicious and she enjoyed the touch the lemon juice and zest provided.  She did not believe these were dairy-free!!!  The filling turned out creamy and delicious very similar to the original ones we enjoy so much.

Quinoa Pasta with Baby Spinach

14 Jan

I love pastas… and when trying to do gluten-free for a few weeks, I crave it more and more each day.

We found this new pasta over at Costco – QUINOA PASTA!! I was skeptical at first, but it’s awesome! Cooks just the same and even better, I might add, than Tinkyada Rice Pasta, which for years has been my gluten-free pasta of choice. It withstands being left in hot water better than rice pasta.

This is a great recipe that combines pasta and salad all rolled into one… it’s basically pasta, salad and vinaigrette. It’s easy to make, delicious to eat, fast as it takes as long as the pasta takes cooking and even works great for company. I am planning to make this for someone new I’ve been seeing lately. Shhhhhh!!!! But, that’s just between you and me, OK??

WP_20131211_002

QUINOA PASTA WITH BABY SPINACH

2 heaping cups of dry quinoa pasta
4-5 large handful baby spinach
2 garlic cloves, peeled and smashed
2-3 tbs of olive oil
The zest of 1 lemon
The juice of ½ of that same lemon
¼ cup parmesan cheese, optional
Salt and freshly cracked black pepper to taste
  1. Bring a large pot of water to a boil, add salt and cook pasta according to the package directions. I usually boil the pasta for about 7-8 minutes, kill the heat, cover the pot and allow the pasta to continue cooking in the hot water.
  2. In a skillet over mdium-low heat, add about 2tbs of olive oil and the 2 garlic cloves. The garlic will infuse the oil with its taste. Allow the garlic to cook a bit in the hot oil, but don’t fry it, cook it just until it starts to change colors. Take the garlic pieces out and discard them. Turn off the heat and add the lemon zest, the juice and season with salt and pepper. Mix together and keep in hold until the pasta is done.
  3. Drain the pasta and return to the same pot. Add the baby spinach and the olive oil/lemon mixture. Toss well to combine. The heat of the pot and the pasta will start to wilt a bit the spinach. It’s possible you may need to add the spinach in batches, but that’s ok. I like that some of the spinach wilts more than others.
  4. Add an additional drizzle of olive oil and the parmesan cheese, if using. Toss one last time to combine and serve immediately.

Natural Safe Ways to Clean your Produce

3 Apr

I’ve mentioned to you already how I like to use a produce cleaner like Fit to clean my fruits and vegetables from the chemicals, pesticides and wax companies throw over produce to make them look particularly pretty for display at the supermarkets. They might look pretty, but those chemicals are definitely no good for our health.

But what do you do if you don’t have Fit or any other commercially available produce wash with you??

There are indeed natural ways to clean your fruits and vegetables… using lemon juice, vinegar or a combination of the two.

Limas 2

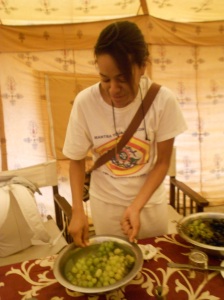
Grapes are fruits we enjoy a lot – we love to welcome in the New Year by eating 12 grapes to ask for 12 wishes for the new year. And after 10 days of fasting and cleansing your system, the last thing you want is to intoxicate your body with the pesticides and wax non-organic grapes are coated with.

All you need to do is soak the grapes in water and add the juice of 2-3 lemons or limes to the water the grapes are soaked in. Try for the grapes to be submerged as much as possible in the acidic solution. If not possible, then be vigilant and rotate the grapes so at some point they’re all soaked with the acidulated water. If using vinegar, try 2 tsps per gallon of water. Soak the grapes for only 20 minutes to 30 minutes tops. After that, the grapes start to soak the acidic water and they start to become mealy… not a good thing.

The acidic nature of lemon juice or vinegar dissolves and breaks down the wax covering the grapes… Check out this side by side pic of grapes washed in just water and grapes washed in the lemon water.

??????????

Knowing this method, we were able to thoroughly wash grapes we purchased right on the streets of Allahabad. Lemons are very common in India and unfortunately, waxed grapes are too.

??????????

??????????

??????????

After the grapes, or any other fruits you wish to enjoy, are cleaned… just dry them off and store as you would usually do – in the fridge or countertop. Or just go ahead and eat them immediately!!!

Mixed Green Salad… great way to return to the land of the eaters

11 Mar

After a week without eating solid foods, you certainly want to maintain your system as clean as possible. We are encouraged to eat only fruits and salads after we finish our spiritual retreats.

This was the salad I made right after we came back to the “land of the eaters”… it was improvised by what was freshest at the market on New Year’s Day, but it turned out to be so delicious, that we prepared it exactly the same for a few days after because I got so enamored of the flavors.

This is my way to get you enamored with salads too… hope it works!!!!

Salad - After Retiro

MIXED GREEN SALAD

2 large handfuls of Baby Arugula
1 large handful of Baby Spinach
1 handful of Alfalfa sprouts
1 Tomato, sliced
¼ cup sliced Almonds
¼ cup dried Cranberries
Lemon Vinaigrette – Lime juice, Extra Virgin Olive oil, Salt and Pepper
  1. Combine the first 6 ingredients in a large salad bowl. Squirt the juice of ½ a lemon, drizzle some olive oil and season with salt and pepper. Toss all the ingredients with your hands to combine well.
  2. Eat immediately… as the lettuces will wilt if you let this salad sit for too long.

Grilled Asparagus

11 Oct

It might seem weird to you that I am posting an asparagus recipe in the Fall… but I had these pictures taken for a few months now, but never got around to write a post about it. And given I have noticed how many readers we have from the Southern Hemisphere, then it should be just as appropriate to post something that goes with their Spring season starting just now.

oooooooooooooooooooooo

The asparagus I grew up with were canned and I usually ate them almost exclusively in a party sandwich like these…

But I have come to develop a great love for asparagus, especially when they’re abundant and fresh in season in every farmer’s market near you.  This is an easy delicious recipe to snack on or as a side dish…

GRILLED ASPARAGUS

½ a bunch of asparagus
Salt and Pepper to taste
The juice of ½ lemon or lime
Olive oil
Parmesan cheese

I like to use a grill pan for this… and I like pencil-thin asparagus.

  1. Clean the asparagus by trimming the end where the asparagus breaks on its own when you bend the stalk. That end will be stringy and not pleasant to eat anyway. You can keep it to flavor some vegetable stock if you want. Season with olive oil, salt and pepper and massage the asparagus to make sure they’re all coated and seasoned.
  2. Heat grill pan over medium-high heat. Place your asparagus as flat as possible on top of grill pan. Allow them to cook for a few minutes. Turn them around by rolling them on their side so they get grill marks on various sides.
  3. When they turn bright green, about 4-5 minutes, they’re most probably done. Turn off the stove and squirt some lemon juice on top. Take them off the grill pan and serve, sprinkling some grated parmesan cheese on top to season.