Archive | main courses RSS feed for this section

Vegan Spanokopita

8 Oct

I love Greek food… and every time I visit my sister we always order from this little Greek restaurant next to her place.  I loooove to order myself a Stuffed Pita Sandwich made with Greek Salad inside.  It’s so delicious I even crave it as soon as I book my flight to FL.

For a while, my sister avoided dairy… and she loves to eat the spanakopita triangles at the Greek restaurant I mentioned above.  So as the big sister, I decided to make her some spanakopitas she could actually enjoy without the side-effects dairy was bringing her for a while.

Here’s my take on cheese-free vegan spanakopitas…


Recipe from KarmaFree Cooking

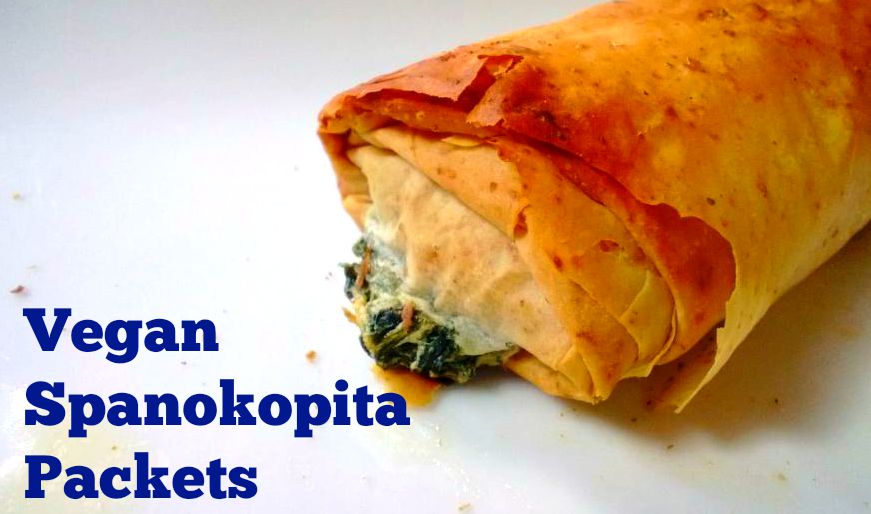
DAIRY-FREE VEGAN SPANAKOPITAS

1 packet of whole wheat phyllo dough – 16 sheets

1 ½ packets frozen spinach, defrosted and squeezed dry

1 container Tofutti Better than Cream Cheese

½ container Tofutti Better than Sour Cream

½ container Tofutti Better than Ricotta

2 yellow lemons – zest and juice

1 sweet onion, chopped finely

½ cup fresh flat leaf parsley, chopped

½ cup fresh basil, chopped

1 tbs Kosher Salt

½ tbs Pepper

About ½ cup Olive Oil, divided

  1. In a large bowl combine the spinach, onions, cream cheese, sour cream and ricotta, parsley, basil and a drizzle of olive oil.  Add the zest of the 2 lemons and follow adding the juice, making sure you avoid getting lemon seeds in the mix.   Season generously with salt, pepper and garlic powder.  Combine well and set aside.
  2. To prepare working with phyllo dough I first gather 2 clean kitchen towels and I get them wet and squeeze them dry so now they’re thoroughly damp.  One will be to cover the unused phyllo sheets and the other one to cover the spanakopita pockets after they’re aseembled but before we bake or pack them.
  3. Now that you have your damp cloths or towels, we gather our phyllo dough, olive oil and a teaspoon – the one you eat with, not the one you use to measure recipes.  I work on a large cutting board…  Place one sheet of phyllo dough on the board.  Make sure you cover the unused phyllo sheets with one of the damp towels.  These will maintain them pliable and ready to work with.  If not, they’ll dry out and turn brittle and will be very difficult to work with in this recipe.
  4. Drizzle in a squiggly fashion a teaspoon of olive oil over the phyllo sheet.  Using the teaspoon kinda spread the squiggle trail you made…  Carefully, overlap a second sheet of phyllo right on top of the first one.  Drizzle a very thin stream of olive oil in the same squiggly fashion but on the opposite direction.  For example, the first squiggle you went from left to right.  Now the second one, go top to bottom in front of you.
  5. Using a sharp knife or a pizza cutter, cut the phyllo sheet stack you just created into 4 sections or strips.  I cut halfway and then I cut each half in half again.  This doesn’t have to be exact, although you can certainly use a ruler to measure this.
  6. Now, add about a tablespoon of spinach filling and place in the bottom section of one of the phyllo strips, leaving about 1 inch of phyllo below where you place the spinach.  Fold this bottom part of phyllo over the spinach kinda like folding a letter.
  7. Now fold the sides of the phyllo strip inside, kinda like the way you fold in a burrito.  Now, fold the section where the spinach is enclosed onto itself until a small rectangular package is formed.
  8. Place spinach pockets in a baking sheet and cover with damp cloth as you go preparing the rest of the spanakopita pockets.  You should end up with about 32 pockets  over all.  You could also stack up 3 sheets of phyllo to make it even flakier.  Use the same method, you’ll just end up with 20 finished spanakopita pockets overall.

Now… you can either bake them or freeze them.  If you decide to freeze them, just place them in freezer zipper bags in layers separating each layer using parchment paper r even waxed paper.  They will keep in the freezer for a while, and are very convenient.

  1. To bake them…  just turn the oven to 375F and place the spanakopita pockets in a baking sheet that has been sprayed with olive oil spray.  Place them in a single layer and spray once again over the top with a light spray of olive oil spray.  Bake in oven for about 12-15 minutes until they turn golden brown.  Sometimes, I just turn off the oven and leave them there to make sure the filling is nice and cooked when I take them out.

Wait a bit to bite into them because the filling will be H-O-T!!!!

These pockets are a tad larger that the triangles I am used to make.   These are more fitting for a light lunch or even a light dinner.  I bake myself 2-3 of these with a salad.

My sister thought they were delicious and she enjoyed the touch the lemon juice and zest provided.  She did not believe these were dairy-free!!!  The filling turned out creamy and delicious very similar to the original ones we enjoy so much.

Avocado Pasta

22 Sep

Avocado season is here…  and even though a few slices of avocado is the perfect accompaniment to any meal, and with so many ripening all at the same time, I’ve had to find creative ways to eat them all by myself…

This Avocado Pasta has become the last few weeks in my go-to lunch… it’s easy to make, mainly an assembly of flavors, because all you are cooking is the pasta.  Think of it like a pasta salad meets a guacamole and they decide to hang out together…  It’s refreshing because of the addition of the spearmint leaves.  Do not skip them… it’s partly what makes this dish special.  Trust… and your taste buds will be rewarded.

Recipe by KarmaFree Cooking


AVOCADO PASTA

2 cups uncooked pasta, I use gluten-free quinoa pasta

2 medium avocados, chopped

1 shallot, minced

15-20 grape tomatoes, halved

15 spearmint leaves and 5 extra ones, all julienned and separated

5-6 sprigs of flat-leaf parsley, chopped

The juice of 1 lime

3 large handfuls arugula

Extra Virgin Olive Oil

Garlic Salt

Salt and Pepper


  1. Cook by boiling your desired pasta in salty water according to the package directions…  I used quinoa pasta this time around.  I buy it at Costco.
  2. While the water boils and past cooks, prepare the avocado mixture – in a bowl mix together the avocados, shallot, lime juice, tomatoes, parsley, 15 spearmint leaves.  Season with olive oil, salt and pepper and toss well to combine the flavors.

Recipe by KarmaFree Cooking

3.  When the pasta is fully cooked, drain it well and add to the bowl where the avocados and tomatoes have been marinating.  Toss well to combine.  Add the arugula leaves, a light sprinkle of garlic salt and extra spearmint leaves and toss one final time to combine and for the arugula to wilt a bit.

Serve immediately.

Recipe by KarmaFree Cooking

Lau Lau

18 Sep

Lau Lau’s are leaves stuffed with sweet potatoes and steamed.  This is a very typical luau dish in Hawaii.  I have made plenty of times stuffed cabbage leaves (not to self…  share these recipes on the blog), but I have never worked with collard greens, as the recipes I found on the internet called for.   I was prepared to make this recipe with large kale leaves or even cabbage.  I was so pleased to see collard greens in the supermarket. Yay!!!!

Again… this recipe is not difficult at all.  It just has a few steps to it to ensure the end result looks and tastes as good as it can be.

I don’t know how large they make these in Hawaii…  but I had to cook for at least 40 people, and we had 10+ dishes for people to choose from, so I made them small.  I used half a collard green leaf for each lau lau packet.  If the leaf was small, I used one whole leaf.  You can certainly make them as large or as small as you wish.

The folding takes a little getting used to just until you figure out the best way to keep all the delicious sweet potato mash inside the green leaf.

Recipe from KarmaFree Cooking

LAU LAU

10-12 collard greens leaves

2 medium-sized white sweet potatoes, peeled and cut into 1-2 inch chunks

10 cremini mushrooms – chopped

2 cups frozen spinach, thawed and squeezed dry

1 large onion, chopped small

1 red bell pepper, chopped small

2 cloves garlic, chopped finely

1 vegetable bouillon cube

About ½ cup coconut milk

Olive oil

Salt and Freshly cracked Black Pepper

  1. In a medium saucepan, add sweet potato pieces and salted water to a boil.  Cook until they’re cooked and can be pierced easily with a fork.  Set aside leaving them in the cooking water to maintain warm.
  2. Fill a large but shallow pot with about 2 inches of water and bring to a boil.  Salt water heavily, as if you’re cooking pasta.  Place a few collard greens leaves at a time and cook for about 1-2 minutes or until slightly soft and color gets bright green.  Transfer to a bowl filled with salted ice water for leaves to cool and stop cooking.  This will also preserve the bright green color.  When leaves are cool, transfer to a plate lined with paper towels to drain.  Set aside.
  3. In a large skillet, drizzle a little olive oil and sauté onions, peppers, garlic with the vegetable bouillon cube.   Add cremini mushrooms and cook until they get a little color.  Add spinach and combine all the flavors together.  Season with salt and pepper one last time and set aside.
  4. In a large bowl, add the boiled sweet potatoes and mash them with a drizzle of olive oil.  Add the cooked mushrooms, spinach and veggies to the sweet potatoes and mash it all together.  Soften the mash by adding coconut milk.  Go little by little to make a soft mash.  Try not to add too much coconut milk or it might get soupy.
  5.  Pat dry the collard greens leaves.  Cut away the stem from each leaf.  I then cut each leaf, which are generally pretty large in half, along the same line where the stem used to be.
  6. Place about ¼ cup of mash in the bottom part of the leaf, leaving about 1 inch border, and roll it like you would a burrito…  fold bottom edge   of collard green over filling, fold in sides and roll away from you, creating as tight roll as possible.  Do this until you run out of leaves and/or filling mash.

At this point… you can save them to steam later or you can steam right away.  For the Hawaiian Festival, we rolled them the night before and steamed them the morning of our lunch festival.

  1. Set up a steamer pot with boiling water.  Transfer rolls to a steamer basket, cover pot and steam for 2-3 minutes.  Increase steaming time to 5 minutes if you made these in advance and are coming cold out of the fridge.  Transfer to serving platter carefully with tongs.

The collard greens are hearty, but are already tender enough that they cut easily.  The filling is sweet and savory.  This is great new way to enjoy cooked greens that still look vibrant green.

Colombian Breakfast Arepas

8 Sep

I’ve never been to Colombia…  YET.  But I have many Colombian friends who boast the deliciousness of their native cooking – Rubén, Andrew, Karina, Enrique, and my good friend, Dolly.  Whenever we visit our Yoga Center in Queens, she always wants to please our Guruji, and all of us who visit, with many of her Colombian favorite recipes.

Lately, she’s been making us her Colombian Arepas.   These arepas are made with yellow cornmeal and topped with your favorite veggie mixture.  We are busy yogis, so Dolly uses frozen pre-made arepas from La Venezolana, but there are many good brands out there.  Try to pick a brand that’s as natural as possible, with the least preservatives.

Here, I will share the recipe for the delicious topping…

Recipe by KarmaFree Cooking

COLOMBIAN BREAKFAST AREPAS with MIXED MUSHROOMS

4 corn arepas – the refrigerated kind

6 large white mushrooms, chopped finely

1/4 lb oyster mushrooms, chopped finely

1 yellow onion, chopped

½ red bell pepper, chopped

½ yellow bell pepper, chopped

2 roma tomatoes, chopped

2 tbs garlic and herb butter or use vegan butter if you prefer

2 sprigs of thyme, leaves only

¼ cup apple cider vinegar

2 tbs soy sauce

¼ cup wáter, if necessary to make a sauce

1 cup vegan shredded cheese – I used Trader’s Joe’s vegan cheddar/monterrey jack mix

Vegan mayonnaise

2 tbs Olive oil

Salt and Pepper to taste


  1. To thaw the arepas, place them in a 350F oven in a baking sheet covered with parchment paper… or place them on top of a griddle.  The oven is helpful because it can fit as many arepas as you want.  This recipe is good enough for 4 arepas, but it’s easily doubled if you need more for your crowd.
  2. In a large skillet over medium-high heat, drizzle a little bit of olive oil to the garlic/herb butter.  Add the mushrooms
  3. and toss them to coat them with the oil and butter.  Spread them out in the skillet so they can get browned.  Resist the urge to move them around.  Wait until the mushrooms start to give off the smell of a cooked steak…  I know…  I know…  but you’ll remember me when the smell hits your nose.  You might want to turn on the smoke extractor in your kitchen for this one…
  4. When you’re ready to move the mushrooms again, add the onions and peppers.  Season with salt and pepper and toss the whole contents of skillet so the onions and peppers cook.
  5. The arepas should be warm now in the oven… take them out, spread a generous schmear of vegan mayo and place about ¼ cup of shredded vegan cheese on top of each arepa.  Place back in the oven for a few minutes for the cheese to melt thoroughly.
  6. After a few minutes reduce the heat to medium, add the tomatoes and season with the thyme leaves.  After about 1-2 minutes, add the vinegar and soy sauce to start to create a sauce.  If the tomatoes do not give out too much liquid, add a little water to create a sauce.
  7. As soon as the cheese is melted and the mushrooms, onion, tomato mixture is cooked, you can assemble…  Place one arepa with melted cheese onto a plate and cover with a healthy helping, about ¼ of the mushroom mixture over it.  Serve alongside a simple green salad on the side.


I’ve had this dish originally as a hearty breakfast/brunch item… but I have also made it as a light dinner option.   Add a few slices of avocado, and you’ll be golden.  It’s easy to make and super filling.  Hope you enjoy ittoo…

Stewed Tofu

23 Jun

This is one of my mom’s signature dishes… she cooks it all the time, especially if we need to cook for a crowd.  We have cooked this recipe at the Yoga Center, when we’ve had to cook for yoga friends while traveling and even for my niece and nephew.  They love saucy tofu, especially when mixed into a nice helping of rice.

It’s a simple, kinda one-pot dish…  kinda, because my mom likes to sear the tofu in a skillet before adding to the stew.  This gives the tofu a chewy consistency that I find more palatable and interesting.   And again… think of tofu as a blank canvas.  It will taste just as good as the seasonings you use on it.

Tofu in Tomato Sauce with Onions and Peppers

STEWED TOFU

1 block of extra-firm tofu
Garlic and Herbs Seasoning
2 large red skinned potatoes or Yukon Gold, cubed
1 large onion, diced
1 green bell pepper, sliced
1 red bell pepper , sliced
1 tablespoon of sofrito
2 garlic cloves, minced
1 jar of stewed tomatoes or chopped tomatoes
1/4 cup of water – if needed
1 vegetable bouillon cube
Salt and pepper to taste
10 large olives or 2 tablespoons of capers
2 bay leaves
a large dash of paprika
a few splashes of apple cider vinegar
2 tablespoons olive oil

  1. Slice each tofu block in 4 slices.  Place slices in a baking sheet lined with 2-3 paper towels.  Cover with 2-3 additional paper towels, top with an additional baking sheet and weigh with something heavy.  Drain weighed tofu slices for about 30-60 minutes.
  2. After tofu slices are drained, season liberally with Garlic and Herbs seasoning.   Cook tofu slices in a dry non-stick skillet.  After you’ve placed them on the skillet, leave them for a while without touching them.  The crust they will develop will prevent them from sticking to the skillet and make it easier to turn them.  Sear them on both sides.  Set aside to cool off.
  3. In a large pot over medium heat, pour olive oil. Mix in the onions, peppers and sofrito, and vegetable bouillon cube.   Add the garlic and salt and pepper to taste.
  4. When onions and peppers have softened, add in the potatoes. Stir a few times for them to start cooking a bit.
  5. Add the tomatoes, olives or capers, bay leaves and paprika. If there is not enough liquid for the potatoes to cook in, add some water, until the potatoes are covered. Add the vinegar.  Cover the pot and allow it to simmer to cook.
  6. Take the cooled tofu slices and slice them again into smaller pieces.  I slice each piece into 4 smaller pieces, which yield me about 32 tofu pieces total.  But if you feel you want the pieces larger or smaller, slice them to your desired size.  It’s your stew, your tofu…
  7. When the stew has cooked for about 20 minutes already, add the tofu pieces to warm up with the sauce and potatoes.  Simmer in the covered pot for about 10 more minutes, about 30 minutes total time or until potatoes are fork tender.

Serve over brown rice.

%d bloggers like this: