Hazelnut Praline

7 Mar

I have been meaning to share with you some desserts, but I wanted to make them with Almonds.  Every-time I go to the market, I forget to buy them.  If I don’t write it, I will never remember it.

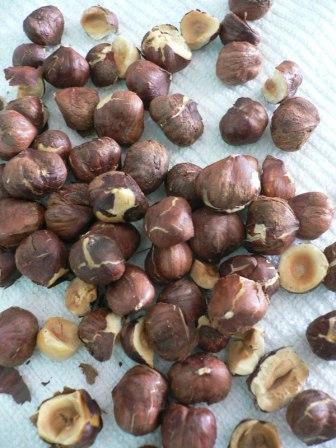
Then the other day I was reorganizing my fridge (in preparation to my upcoming trip to Costco) and I found along lost bag of shelled hazelnuts.  My dear mom helped me shell these hazelnuts I bought before Xmas and I never got to eat and they were sitting, very unassumingly, in this ziplock bag in the back of my fridge… how about Hazelnut Praline!!!  I am sure it will taste fantastic too.  It did…

 p1030072.jpg                

HAZELNUT PRALINE

1/2 cup shelled hazelnuts
1 tbs maple sugar
1 1/2 tbs maple syrup
  1.  I like to start with peeled hazelnuts.  I think the taste of the nut comes across better when the little skin is taken off.  So to do this with hazelnuts, I roasted them for a little while in a 350F oven for about 10 minutes.  They’ll start to smell a bit.
  2. Then place them in a clean kitchen towel and scrub them all together.  Most of the skins will come off.  Some I had to peel a bit of my hands.  Wait a bit until the nuts cool down some.  You don’t need to get your fingers burned.
  3.  p1030076.jpg
  4. Cut the hazelnuts in a smaller pieces.  I used a serrated knife and it worked very well.  The nuts did not fly all across the cutting board.
  5. Mix the nuts in a medium bowl with the maple syrup and maple sugar.  Transfer to a parchment lined baking sheet and bake in a 350F oven for about 12 minutes.  I try not to leave the kitchen because nuts tend to burn fast and remember, you may have already roasted them a bit already to skin them.
  6. When they’re done, they’ll smell really sweet and nutty delicious.
  7. Be careful taking them out of the oven, but transfer then to a metal dish right away to help them cool off.  I sometimes put the nuts in the fridge to help keep them away from the humidity we always have here in PR.

p1030085.jpg

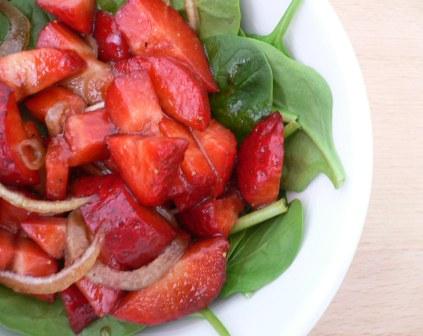
Snap the nuts loose and eat them alone as a snack or sprinkle them over your favorite dessert.  I particularly enjoyed them today with my Roasted Pears with Blue Cheese.

Spinach Strawberry Salad

7 Mar

I went to Costco yesterday.  And here in Puerto Rico, Costco has the BEST produce you can find… everything is beautiful and fresh and gorgeous. 

I bought yesterday strawberries (you know how I feel about strawberries), grape tomatoes and organic baby leaf  spinach.  You’ll be seeing these ingredients in the next few posts, I’ll promise. 

As I was doing my Serious Eats site daily perusing – I noticed this Talk string about being on a “kick”.  I get those sometimes, but nothing lately.  I read the post from evilchefmom saying she’s on a Strawberry Spinach Salad kick…  That’s exactly what I bought today – baby spinach and strawberries, never thinking when I bought them I would actually eat them together.

I decided to make my version of what she wrote… I do not normally mix fruit in my salads, but I decided to take a chance.  The results were DELICIOUS!!!!  Sweet and tangy, a very different salad that screams for company…

 spinach-strawberry-salad-comp.jpg

SPINACH AND STRAWBERRY SALAD

for one
2 handfuls of washed organic baby spinach
3-4 beautifully ripe strawberries – hulled and cut in pieces or slices
2-3 very thin slices of red onion
1/3 cup extra-virgin olive oil – the best one you can find
2 splashes of balsamic vinegar – about 2 tbs
Salt and Ground pepper to taste
a squirt of Honey
  1. In a medium sized bowl prepare the dressing – Whisk together the olive oil, vinegar, salt, pepper and honey.
  2. Add the strawberries and onions to the dressing and toss to coat.
  3. In a salad bowl, arrange the baby spinach leaves and top with the strawberries, onions and dressing.

I was so pleasantly surprised by how much I liked this flavor combination, that I immediately made a mental note to serve this salad at any upcoming dinner party… this is too good to keep to myself.

Thanks eveilchefmom for showing me something I have never tried before… 

Strawberry Banana Sherbet

5 Mar

I know it’s the middle of winter in the US… but it’s 83 degrees in Puerto Rico.  I am working without air conditioning for a few weeks now and I need something to cool off with when it gets hot.  So I decided to put together a few frozen things I already had in my freezer and see how they tasted all-together…

This is how Strawberry Banana Sherbet was born.  Nice little experiment, no?

 sb-sherbet.jpg

STRAWBERRY BANANA SHERBET

1 cup strawberries
1 medium banana
1/4 cup brown sugar
1/4 to 1/3 cup fresh orange juice – nobody will notice if you use Tropicana, so don’t worry
juice of 1 lemon
1/2 cup of kefir – this will make it a sherbet, rather than a sorbet
  1.  Mix all the ingredients in a blender.
  2. Pour the mixture in a container to freeze up.  I used an ice tray… it’s convenient and helps in portion control too.  You could also use mini plastic cups or even place a wooden stick to serve as popsicles.
  3. Freeze for about 2-3 hours until it hardens up


sb-sherbet-2.jpg


I used fresh fruits I had frozen myself, but you can use fresh ones if you have them around or even frozen fruits bought from the supermarket.  I am sure you can use the same method to create other nice fruit sherbets.  I will be experimenting a few more in the coming weeks.  I promise to share.

Sweet Potato Pastelón

3 Mar

I know this is not exactly a potato, but I wanted to add a new recipe to my Potato Festival collection.  In English, it fits.  In Spanish, it does not (Pastelón de Batata Mameya).  It’s delicious and super easy in either Spanish or English, so here it goes…

  pastelon-batata-2.jpg

SWEET POTATO PASTELON

1 medium sweet potato or batata mameya – washed, peeled and cubed into 1″ slices
1/2 tomato – chopped finely
1/2 onion – chopped finely
1/4 green pepper – chopped finely
1 tbs butter or margarine
2 tbs Parmesan cheese
Extra-virgin Olive oil
Canola spray
Salt and Pepper to taste
  1. In a medium pot, place sweet potato cubes, almost cover with water, sprinkle with some salt.  Cover and boil until fork tender.  This should take about 15 minutes.
  2. In a small skillet, pour about 1tbs olive oil and sautee the onions and peppers.  When they’re starting to turn soft, add the tomatoes until everything is soft and cooked. Season with salt and pepper.
  3. Drain the boiled sweet potatoes and return to the hot pot.  Add the butter, Parmesan cheese and mash until smooth with a potato masher.
  4. Transfer mashed sweet potato to a glass baking dish sprayed with canola oil. Spread it evenly.  Now, pour the sauteed mixture of onions, peppers and tomato on top of the mashed sweet potatoes.
  5. Place in a 350 degree oven so the sweet potato compacts a bit and the flavors meld.  For about 10-15 minutes.  It’s just for melding the flavors, because everything is basically cooked.

Serve with a simple salad for a nice supper or light lunch.

And if you’re in a hurry… just serve the mashed sweet potato and spoon the tomato/onion/pepper mixture over it.  It tastes just the same.

pastelon-batata1.jpg

No-Knead Bread – Consolation prize for my ego

2 Mar

I already told you about my fiasco story on the Daring Bakers Feb 2008 Challenge – Pain Francais.

So, to give myself an ego-boost, I decided to try out the NY Times No-Knead Bread Recipe…  of course, with a few modifications because I was using whole wheat flour again.  For months I have been meaning to make this recipe… and to me it was a dream come true, because one of the reasons I have never dared to make any breads or pizza dough is the lack of a Stand mixer – remember my Xmas wishes??? So, this recipe eliminated that need…

For this recipe you need a cast iron dutch oven… yikes, I don’t have a cast-iron dutch oven either. But my friend Kathleen told me I could probably do this with a Pyrex bowl on top of a baking sheet.  I don’t have a big Pyrex glass bowl, but my mom has a glass Pyrex dutch oven – the best of both worlds. 

You still need to plan this recipe out… it needs about 12 hours to proof.  It’s not like you get a bread craving and you can make this in a pinch.  You can make the dough at night to bake it in the morning, or make the dough in the morning to bake the bread at night. 

 noknead-bread-1.jpg

NO-KNEAD BREAD

Adapted from the original No-Knead Bread recipe from the NY Times.

3 cups of whole wheat flour
1/3 cup brown sugar
3/4 tbs kosher salt
1 package of dry active yeast
squirt of honey
1 3/4 cups of water
2 tbs wheat germ
Covered Pot – (5 quart or larger cast iron, Pyrex, ceramic, enamel – something that can go into a 450F oven)

Mix the Dough

  1. When using whole wheat flour, I read in several sources that it’s better to proof the yeast before mixing in the rest of the ingredients.  So take like 1/2 cup of the water the recipe calls for and dissolve the yeast packet.  Add a squirt of honey to help it come alive.  (I threw away several packets of yeast thinking they were dead before doing this little trick to it.) 
  2. Combine all ingredients in a big bowl with a wooden spoon until the dough just comes together.  It will be a shaggy, doughy mess.  Control the urge to add more water.  Cover with a plastic wrap and let sit in counter-top for about 12 hours.  The room should be about 70degrees F.  Leave for up to 20 hours if room is slightly cooler.

Shape and Pre-heat

  1. The dough will be wet, sticky and bubbly.  With a wet spatula, dump the dough onto a floured surface. 
  2. Fold ends of dough over a few times with the spatula and nudge it into a ball shape.  You can use your hands if you prefer.
  3. Generously dust a flour sack towel with flour and wheat germ. Set dough seam side down on top of towel.  Let it rest for 2 hours.
  4. Set 2 timers – 1 for 1:30 hours and one for 2 hours.
  5. When the 1:30 hour timer rings – it’s time to pre-heat the oven.  Put your covered pot in the oven and preheat the oven with the pot inside for 30 minutes at 450 degrees F.
  6. When the 2 hour timer goes off – it’s time to bake.

Bake

  1. The dough should have doubled in size.
  2. Carefully, remove pot from oven.  Holding the dough inside the towel, dump the wobbly dough inside the pot – it does not matter which way it lands.  Cover.
  3. Bake covered for 30 minutes. Set timer again for 30 minutes.
  4. Uncover.  Bake another 15-20 minutes uncovered  until the crust is golden brown and beautiful.
  5. Remove from oven and let cool in a cooling rack.

 noknead-bread-2.jpg

I ate mine warm with lots of butter.  The crust was superb.  I ate some of it, and gave a piece to a friend and my mom, which loved it too.

I still do not consider myself a bread baker by any means.  However, I will definitely make this recipe again… and I know that as I feel more confident with it, I will start making modifications to it… adding cheese, or nuts or other flours.  You’ll see.  I won’t keep it to myself…