Tag Archives: whole wheat

Goat Cheese Toast

28 Jun

When my friend Magda told me about 8-9 years ago that her favorite cheese was goat cheese, I felt kind of lost…  Goat Cheese?  How does that taste like?  Is it soft or hard? Tell me more, tell me more…

So I immediately went to the specialty cheese case in my grocery store to see what this goat cheese was all about.  I was instantly HOOKED!!  I could not believe I had been ignoring the specialty cheese section for so long…  Magda opened up my eyes to the delicious variety of cheeses there are and that there’s more to cream cheese than the Philly kind I love so much… to this day.

One of my guilty pleasures on the weekends (and some weekdays too…) is to make myself a Goat Cheese Toast…  crispy, creamy, tangy – One of my perfect snack foods.


GOAT CHEESE TOASTS

1 whole-wheat baguette
3 oz of soft goat cheese, make sure it’s without animal rennet
Extra-virgin olive oil
Kosher Salt
Freshly-cracked black pepper


  1. Slice the baguette into 2 halves.  Drizzle lightly with olive oil and sprinkle with salt and pepper.
  2. Toast the baguette halves in a 350° F oven for about 5 minutes or just use the toaster setting on your toaster oven.
  3. Take the toasts out (careful, they’re hotter because of the oil) and spread the goat cheese on the bread.  Sprinkle a bit more pepper and drizzle a bit more olive oil for the nice cool finished look.


Enjoy alone, with a nice chilled glass of pomegranate juice… or fill the two halves with a few slices of fresh tomato, baby spinach and roasted peppers for an awesome sandwich.

Leek Rings

2 Jun

In this Good Eats show, Sprung a Leek, Alton Brown suggested that onion rings were invented when someone dropped a sliced onion in pancake batter and that we would have been better off if he would have dropped leeks in the batter… because leeks have less moisture and onions and therefore, remain crisper after frying.

Once again… my dear friend Alton is right!!!!  I loved these Leek Rings and as a garnish to the Potato Leek Soup they work amazing.  They are crisp, oniony and incredible snacks… I must say, I ate all the Leek Rings leaving nothing for when my mom tried it.  Sorry…  I am a bad daughter, I know…


LEEK RINGS

About 2 cups of canola oil
1 leek, cleaned and trimmed of dark green parts
1/3 cup of whole-wheat pastry flour
1/3 cup of water, plus a few tbs more
Salt and Pepper to season the batter
Garlic Salt to sprinkle onto the rings after they’re fried


  1. Because we need the leek in rings, we need to cut the rings first and them dunk them in a large bowl or sink full of cold water to clean them thoroughly of any sand or dirt that they come with, particularly if you’re buying organic.    Cut the leeks in ½ inch rings. No green pasrts this time…
  2. Separate them into layers very carefully.  They might break open.
  3. In a medium saucepan, heat the oil over high heat.  When you insert the back end of a wooden spoon, bubbles should form around the spoon end.  Careful, do not insert a moist wooden spoon, as the water in the spoon can make the oil splatter…  I learn these lessons the hard way… and make sure the pan is thoroughly dry to begin with…
  4. In a mixing bowl, mix together the flour, water and seasonings.  Dunk the leek rings in the batter and transfer carefully into the hot oil in small batches.
  5. Watch the leek rings so they do not stick to much to each other.  When they’re light golden, remove them from the oil and place them in a paper towel to drain the excess oil.  Sprinkle them with garlic salt to taste while they’re still warm.


Enjoy as a garnish for our Potato Leek Soup or by themselves as a snack.  Yummy!!!

No-Knead Bread – Consolation prize for my ego

2 Mar

I already told you about my fiasco story on the Daring Bakers Feb 2008 Challenge – Pain Francais.

So, to give myself an ego-boost, I decided to try out the NY Times No-Knead Bread Recipe…  of course, with a few modifications because I was using whole wheat flour again.  For months I have been meaning to make this recipe… and to me it was a dream come true, because one of the reasons I have never dared to make any breads or pizza dough is the lack of a Stand mixer – remember my Xmas wishes??? So, this recipe eliminated that need…

For this recipe you need a cast iron dutch oven… yikes, I don’t have a cast-iron dutch oven either. But my friend Kathleen told me I could probably do this with a Pyrex bowl on top of a baking sheet.  I don’t have a big Pyrex glass bowl, but my mom has a glass Pyrex dutch oven – the best of both worlds. 

You still need to plan this recipe out… it needs about 12 hours to proof.  It’s not like you get a bread craving and you can make this in a pinch.  You can make the dough at night to bake it in the morning, or make the dough in the morning to bake the bread at night. 

 noknead-bread-1.jpg

NO-KNEAD BREAD

Adapted from the original No-Knead Bread recipe from the NY Times.

3 cups of whole wheat flour
1/3 cup brown sugar
3/4 tbs kosher salt
1 package of dry active yeast
squirt of honey
1 3/4 cups of water
2 tbs wheat germ
Covered Pot – (5 quart or larger cast iron, Pyrex, ceramic, enamel – something that can go into a 450F oven)

Mix the Dough

  1. When using whole wheat flour, I read in several sources that it’s better to proof the yeast before mixing in the rest of the ingredients.  So take like 1/2 cup of the water the recipe calls for and dissolve the yeast packet.  Add a squirt of honey to help it come alive.  (I threw away several packets of yeast thinking they were dead before doing this little trick to it.) 
  2. Combine all ingredients in a big bowl with a wooden spoon until the dough just comes together.  It will be a shaggy, doughy mess.  Control the urge to add more water.  Cover with a plastic wrap and let sit in counter-top for about 12 hours.  The room should be about 70degrees F.  Leave for up to 20 hours if room is slightly cooler.

Shape and Pre-heat

  1. The dough will be wet, sticky and bubbly.  With a wet spatula, dump the dough onto a floured surface. 
  2. Fold ends of dough over a few times with the spatula and nudge it into a ball shape.  You can use your hands if you prefer.
  3. Generously dust a flour sack towel with flour and wheat germ. Set dough seam side down on top of towel.  Let it rest for 2 hours.
  4. Set 2 timers – 1 for 1:30 hours and one for 2 hours.
  5. When the 1:30 hour timer rings – it’s time to pre-heat the oven.  Put your covered pot in the oven and preheat the oven with the pot inside for 30 minutes at 450 degrees F.
  6. When the 2 hour timer goes off – it’s time to bake.

Bake

  1. The dough should have doubled in size.
  2. Carefully, remove pot from oven.  Holding the dough inside the towel, dump the wobbly dough inside the pot – it does not matter which way it lands.  Cover.
  3. Bake covered for 30 minutes. Set timer again for 30 minutes.
  4. Uncover.  Bake another 15-20 minutes uncovered  until the crust is golden brown and beautiful.
  5. Remove from oven and let cool in a cooling rack.

 noknead-bread-2.jpg

I ate mine warm with lots of butter.  The crust was superb.  I ate some of it, and gave a piece to a friend and my mom, which loved it too.

I still do not consider myself a bread baker by any means.  However, I will definitely make this recipe again… and I know that as I feel more confident with it, I will start making modifications to it… adding cheese, or nuts or other flours.  You’ll see.  I won’t keep it to myself…

Pain Français- DBC Feb 2008

1 Mar

I am not a baker.  So I joined the Daring Baker’s Challenge.

pinklogo.jpg

If I am not a baker, why in the world would I join a group of  called Daring Bakers???  To get out of my comfort zone precisely.  To try recipes I would never dare to try. To learn things, techniques I may be avoiding…  to indeed, become a baker after all.  

I was inspired last month with January’s challenge – Lemon Meringues.  All the recipes I saw looked sooooo beautiful that I felt compelled to join.  Please remind yourselves… I AM NOT A BAKER!!!  My dessert repertoire extends to cookies and flans – anything else besides that is just baked fruits, fruit sauces, and boiling cans of condensed milk… ahhh, and buying Haagen-Dazs mango sherbet at the supermarket.  Yet, after knowing all of this, I dared and joined the group. No pun intended.

I have to admit, I was daunted and excited when I received my first recipe – Pain Français from a Julia Child recipe…. Oh my gravy!!!!  I was excited, as you know I take French lessons at the Alliance Française.  To say I was super excited was an understatement!!  But, why daunted???  French bread only has really 4 ingredients – flour, water, yeast and salt.  What can be simpler???  Anything in this world is simpler, if you ask me. 

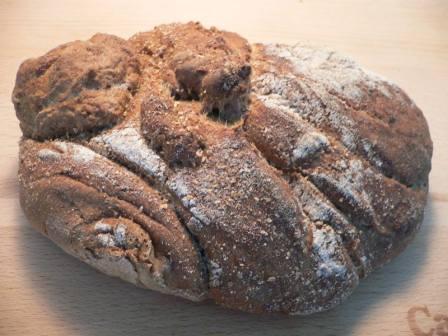
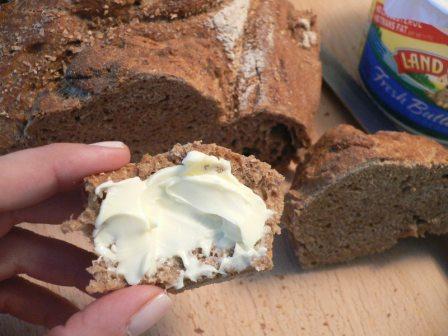
And, I am not a quitter.  I was not going to pass this up , my first Daring Baker’s challenge, just because I had an 11-page recipe – yes, this is not a typo, 11 pages… I was sent a video to see the kneading technique, the forming technique, the baking technique…  I read the recipe 3-4 times.  I saw the video twice. Yet… I never achieved the perfect loaf of Pain Français.  The only thing I did change in the recipe… was the flour.  I only like to use whole wheat products when I bake, so I used whole wheat flour…  here are the results:

This is the flour I used – I do not recommend it for this recipe.  This was the dough, before kneading. How dry it was should have told me something then, but I continued with the process as dictated in the recipe.

french-bread-1.jpg

This was the dough after “kneading” for about 500 times… I was so tired after that, I had to lay down to rest.  Really.

p1020766.jpg

 And this was the frustrating moment when, after 3 hours of “rising time” my dough was exactly the same size as it started.

p1020767.jpg

But, in my opinion, there are many ways to define success.  Success is not only demonstrated by showing here my “perfect loaves of french bread from the first try”… To me, success is also achieved by all the learnings gathered from trying to execute this recipe.  I actually have a list of learnings I would like to share with you and all my fellow Daring Bakers:

  1. You need a really large kitchen with lots of counter space to bake bread. – my kitchen is TINY and trying to knead bread almost inside the kitchen sink is not the ideal of any bread baker.
  2. A Kitchen-Aid mixer is a must if you’re a petite bread baker. – I am sorry, but kneading 800 times by hand is not my definition of a good arm workout.  My arm was about to fall off – I guess because the flour/water proportions were off when using whole wheat… but that’s another learning.
  3. Stone-ground whole wheat flour is NOT ideal when trying to make Julia Child’s french bread recipe. – Start with whole wheat pastry flour and then move gradually to coarser flours, especially when you do not have a stand mixer.
  4. Bread baking is not for the impatient. – You need a good day to make this recipe… no plans to go out, no plans for someone to come over, just stay home and bake bread.  Now I know why Rachael Ray is not a baker…
  5. Bread-baking is not for the compulsive cleaner. – No matter how clean I tried to keep the kitchen floor, there was flour all over… all over!!!  all over my dishes, all over the sink, all over the counters, all over the floor, all over me!!!!
  6. 11 page recipes need to be left to professionals. – I am sure that if I had spent a day learning this by actually watching someone do it, I would have grasped it a little better.  I felt consumed by the pages in the recipe.
  7. I will try this recipe again SOON.– I was not able to do it all over before the posting date, but I will not let this recipe get to me. 

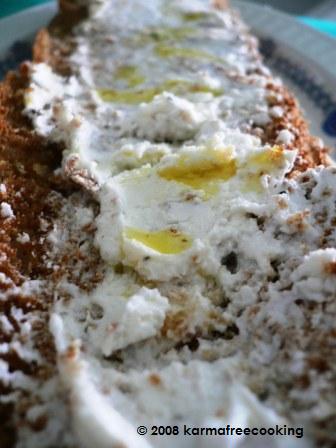
Let’s say I have a new-found appreciation for bread bakers.  And as a consolation prize for my ego… the only thing left for me was to try… The No-Knead Bread recipe. YEAH!!!

Fried Cauliflower

11 Jan

We already established I like fried foods, right?

But believe me, for the amount of fried foods I have posted on this blog, I do not eat that many of them… maybe like once a week, maybe. I think it’s just that we’re around the holidays here and these are “more or less” permissible things around the holidays… eat fried foods now, diet and exercise in the new year… But I find that if you exercise and eat healthy all the time, as part of your daily routine, you can indulge every once in a while in a fried morsel of crispy goodness.

Enough…

Here are my interpretation of Fried Cauliflower. I learned to eat this, believe it or not, at the salad bar at Ponderosa Steakhouse. The salad bars here in PR offer, in addition to the standard salad fare, corn sorullitos, macaroni and cheese, cooked corn, steamed carrots, and sometimes, fried cauliflower. They’re sooooo tasty. But the secret of their tastiness is in the batter. Let me show you how…

fried-cauliflower.jpg

FRIED CAULIFLOWER

1 head of cauliflower, cut in medium sized florets
2 cups whole wheat or spelt flour
2 tbs cornstarch
3 tbs sofrito
1 tbs salt or garlic salt
1 tbs Herbamare herbed salt
a few grinds of cracked black pepper
water – about 2 cups
a few sprinkles of paprika – optional
Canola oil – for frying
  1. In a medium bowl, mix the flour, cornstarch and the water. Mix the water slowly, maybe in two batches. The idea is for the batter to be the same consistency as pancake batter.
  2. Add to the batter, the sofrito, salt, herbed salt and pepper. Add paprika, if using.
  3. Heat about 1/2 inch of oil in a skillet over medium heat.
  4. Dunk the pieces of cauliflower in the batter. Clean the piece of any running batter and place carefully in the hot oil.
  5. Fry the little morsels until golden brown on all sides. It should take a few minutes – this way the cauliflower will cook/soften a bit and the batter will be golden brown and crunchy.

Eat on their own or dunk in Mayo Ketchup.

Hope you like them!!!

%d bloggers like this: