Tag Archives: sofrito

Taro Root Nests

14 Sep

I’m in love with taro root or malangas, as I call them on a daily basis…

Here is a fun and easy way to make taro root for your next party of gathering.

Taro Root Nests

TARO ROOT NESTS

1 pound of raw taro root, peeled and cut into long pieces
1 tsp sofrito
2 garlic cloves, peeled
1 tsp salt
A pinch of freshly cracked black pepper (optional)
Frying oil – canola oil, grape seed oil, vegetable oil, peanut oil, etc.
  1. Shred the taro root pieces using the shredding blade of your food processor.  You could also shred by hand using a box grater, but this would be much harder and take up more time.
  2. Transfer the shredded taro root to a large mixing bowl and season with the sofrito, salt and black pepper.  Grate the garlic cloves using a microplane grater over the shredded taro root mixture.  Combine well all the ingredients using your hands.  I find they work best for doing this.
  3. In a large skillet, add enough frying oil to make it about ½” to 1” deep and bring to temperature over medium-high heat.  The oil will be ready for frying when you stick the back of a wooden spoon into the oil and bubbles form all around it.
  4. Make mounds of the seasoned shredded taro root…  Squeeze out all the starchy liquid from it and place on the hot oil to fry.  Using a spoon, pour some of the hot oil over the mound of shredded taro root to help it cook on the inside and to start to harden the top part a bit.  Place mounds of taro root on the skillet leaving some space between the mounds so they don’t stick together.
  5. After a few minutes, flip the mound on the other side so it fries evenly on all sides.  When the taro root mounds are golden brown on all sides, take them off the oil using a wooden spoon and place them on a plate lined with paper towels to absorb all the excess oil.  If you want, you can sprinkle them lightly with some more kosher salt, but it may not be necessary.

Enjoy these little nest fritters as an appetizer or as the crispy component to any Latin dinner…

Yucca and Soy Fritters

9 May

Paraguayans eat a lot of yucca… they call it mandioca and it’s a daily staple in their diet.

I was forewarned by my mom and other people who’ve been to the Yoga Center in Paraguay that I would have mandioca coming out of my ears by the end of our trip. To be honest… we ate mandioca in various ways, but I never felt overwhelmed by it.

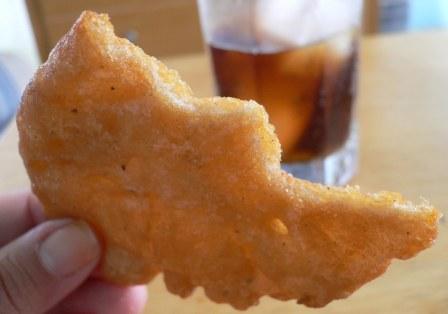
One of my favorite ways to have yucca while we were in Paraguay was in a fritter form. Girl is Latin and we LOOOVE all things fried, no?

We made these as a form of karma yoga to help out an orphanage. My friend Ester and her husband help out this orphanage regularly and the organizer told them a few days prior that their pantry was empty and there are nothing for them to feed the kids with. So Ester and Ferreira rallied a few of us visiting them in Coronel Oviedo to help out the kids.  We made over 200 of these fritters… we only kept a few for ourselves and the rest was given to the kids.

They’re delicious. This is an adaptation of a local dish in Paraguay… the original name is in Guaraní, their native Paraguayan tongue. It’s traditionally made with ground beef but our version uses textured soy protein. The locals say the secret is in how you season it, because none of the non-vegetarians were able to tell the difference.

We did this recipe in very large scale as you will appreciate by the pictures… this is my scaled down version. You can certainly freeze the extra tortas and fry at a later occasion.  Thanks to Ester and Ferreira for the recipe…

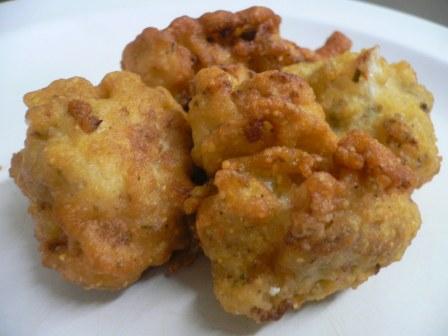
YUCCA AND SOY FRITTERS

4 large yucca roots, peeled and scrubbed clean
1 cup of dry textured soy protein, soaked in 2 -3 cups of filtered water
1 green bell pepper, cut into pieces
1 red bell pepper, cut into pieces
1 bunch of scallions, roots removed and cut in thirds
8-10 garlic cloves, peeled
1 ½ cups of soy sauce
About 3-4 cups of fine cormeal flour
Canola Oil to fry the fritters in
  1. First we boil the yuccas… after the yucca pieces are well-peeled, cut, scrubbed clean making sure the inner core with the tough thread removed, you put them in a pot with plenty of salted water to boil.

We peeled and cooked a whole "saco" of mandioca...

2. Cover the pot while boiling and reduce the heat once it’s reached a rolling boiling point to prevent the bottom pieces from scorching. Boil the yucca pieces until they’re fork tender.

3. After the yucca is cooked, allow it to cool off and dry out a bit over clean kitchen cloths or towels.

4. While the yucca cooks we prepare the sofrito and the soy protein…

5. Using a hand grinder we make the sofrito by mixing the green and red peppers, the garlic cloves and the scallions. Using the hand grinder gives you a coarser texture than using a food processor. But if you don’t have a grinder, pulsing the veggies in your food processor will do just fine. Pulse until the mixture is well ground but not liquidy yet. Set aside.

6. The soy protein should be left to soak in the water for about 30 minutes. After it has soaked for that long and it’s now soft and tripled in size, drain and squeeze it dry. I use a fine mesh strainer and squeeze it using my fist. It does not have to be bone-dry, but it should not be wet and dripping.

7. Place the dried-out soy protein in a large bowl. Add about 1 cup of the sofrito mixture you created. Save any leftover unless it’s just a small amount and just add it up. Add the soy sauce to season and mix everything well. Set aside.

8. Now that the yucca has cooled off, we grind it using the hand grater. This is a labor of love, but you’ll be rewarded for your efforts afterwards. It’s not so bad doing a smaller batch like this one. But we made it for 200+ fritters and we had to take turns grinding yucca. So don’t be surprised with your arm hurts a bit afterwards.

9. After the yucca is ground, add it to the soy mixture. You can add it in batches while you’re grinding it. The yucca is very starchy and it’ll mix into the soy better if it’s just ground. The best way to mix this is using your very clean hands. Mix together the yucca and the soy until you have a homogeneous mixture that’s more yucca than soy.

10. Add about 1 cup of the fine cornmeal and mix well once again. We’re ready to make the fritters…

11. Prepare a tray with some cornmeal in the bottom. The mixture is sticky and the cornmeal will prevent them from sticking too much to the tray or your hands.

12. Using a generous amount of corn flour, create tennis-sized balls. Use plenty of corn flour… don’t be afraid to use it. After a ball is created, pat it into a patty. Set aside on the corn flour dusted tray. Keep making fritters until you run out of mixture.

13. In a large skillet filled with about 1 inch with oil over medium high heat, we fry the fritters. After you put them in, leave them until they develop a crust on one side. They’re soft and they’ll break apart if you move them around before once side if crispy. Sometimes it helps if you do not crowd the pan too much and if you spoon some of the hot oil over the fritter so that the top side hardens just a tad bit before flipping.

14. Flip them carefully using a spatula and fry golden brown on the other side.

15. Drain over a clean paper towel over a tray… wait a bit until they cool off to take a bite.

These fritters are a bit of a labor of love… but they’re well worth it. If you’re Paraguayan and know the name in Guaraní of this fritter, please share it with us in the comment section. GRACIAS!!!

Fresh Fettuccini with Barely-Cooked Fresh Tomato Sauce

3 Jun

This was an exercise in maximizing the concept of fresh, seasonal and local cooking…  even though the dish initially looks more Italian, but this is Puerto Rican cooking at its utmost expression. Why?

Because the main components of this meal were grown or produced right here in Puerto Rico:

  • The pasta is freshly made here in San Juan by my friend Karla from nudi pasta
  • The tomatoes and basil for the sauce came from my CSA box… as did the mesclun greens and the cucumber for the salad
  • The green peppers in the sofrito came from the CSA box too and the “ají dulces” came from my aunt’s backyard

I have made marinated/un-cooked tomato sauce before, but I just wanted to see if I could pull-off a sauce that did not need to be on the stove for hours to achieve a deep flavor.  I believe we have reached success here.  Also, fresh fettuccini is super delicate… I am not used to cooking pasta so little. So a friend gave me the idea to cook the pasta in the same sauce, instead of boiling it first.  It actually turned out really nice… even though I feel I have not yet mastered the art of cooking fresh pasta to perfection.

 Fett w- BC Tom Sauce

FRESH FETTUCCINI WITH BARELY-COOKED FRESH TOMATO SAUCE

3 small organic tomatoes, chopped
2 sprigs of fresh basil, leaves and stems separated
1 tsp sofrito
1 tsp tomato paste
Salt and Pepper to taste
1 tbs balsamic vinegar
1 tbs olive oil
½ package of whole-wheat fresh fettuccini


  1. In a medium skillet with tall sides over medium heat, pour the olive oil and the sofrito. Cook for a few minutes while you chop the tomatoes.
  2. Add the basil sprigs and leaves.  Cook for a minute and add the tomato paste.  Stir to combine.  Add the chopped tomatoes with all its juice… make sure you have all the seeds and juice to make the sauce liquidy. 
  3. Season with salt and pepper to taste and add the balsamic vinegar.  Cook for about 5 minutes so the flavors combine.
  4. Barely-cooked Tomato Sauce
  5. Add the fresh fettuccini to the sauce and toss to combine well.  After a few minutes, turn the stove off and cover to allow the pasta to cook with the steam and heat of the sauce.

 BC Tomato Sauce

Enjoy with a nice tossed salad using any seasonal vegetables you might have on hand.  I used mesclun greens and cucumbers with a light lemon vinaigrette.

If you would like to see other recipes of Seasonal Pastas… visit the Serious Eats website were a round up of various recipes are featured as part of the weekly feature Cook and Tell.

Mock Bacalaítos – BacalaFREEtos

2 Jun

Ok… you’ve made the Potato Leek Soup, you garnished it with the fried Leek Rings… but what do you do with the left over batter from the Leek Rings?  Do you throw it out?  Of course not!!!

Let me tell you the story about the Bacalaíto…  what’s a Bacalaíto?

Bacalao is the word in Spanish for Codfish – the salted dry codfish.  They one that looks like an old dried-out shoe sole.  I mean, the fresh codfish is also called bacalao, but you need to preface it by saying it’s fresh bacalao, because traditionally the codfish eaten here is the dried out kind.  Enough with the cod lesson…

Well, a very traditional Puerto Rican fritter is made with the rehydrated and de-salted cod mixed in with a flour batter.  If you go to any Puerto Rican street fair, there will be several stands selling these fritters…  one of my favorites when attending the Fiestas de San Sebastian…  So now that I am vegetarian, how do I satisfy my cravings on these delicious and greasy fritters?

Well, I learned that honestly, if you season the batter well enough, the fried flour mixture will taste exactly like a bacalaíto, but without adding any of the codfish.  Newsflash to all traditional bacalaíto makers… it’s even simpler to make because you don’t have to de-salt and rehydrate anything that once was alive…  it’s the Mock Bacalaíto.  I’ve tried to look for a better name… but locals would not know what it is if I call it something else besides bacalaítos…

UPDATE 1/25/2011 – My friend Angie has coined a NEW NAME for these fritters – BacalaFREEtos… as in Free of Bacalao, KarmaFREE Cooking, and they’re Fried (fritos in Spanish) it’s just too clever huh???  So that’s how we’re calling them from now on.  Angie – you have full name rights on this one!!!

 People can’t believe they taste so much like the real thing… the secret is in seasoning the batter well.  Here’s how…


MOCK BACALAITOS

½ cup whole wheat pastry flour – this will work well with spelt flour too
About equal parts of water
1 tbs sofrito
½ tbs of Kosher Salt
½ tbs of Pepper
Canola oil to fry


  1. I’ll be honest, I have never measured the amounts of the seasoning…  but the batter should taste well-seasoned.  You need it to taste like something, not just like wet flour.
  2. In a large skillet, heat about 1 ½ inches of canola oil.  Make sure the oil is very hot before frying the first batch.  Try inserting the back end of a wooden spoon into the oil and the oil will be ready when you see bubbles around the wood.
  3. Using a large spoon or ladle, pour some of the batter into the oil, like making silver-dollar pancakes.  Wait until the batter has set a bit on the first “bacalaito” before you pour on another ladle.  If they fuse to each other, they’ll be difficult to turn.
  4. Fry on one side until the batter turns crisp and golden brown on one side.  Flip and fry some more until evenly golden.
  5. Transfer the fritters onto a plate with paper towels to drain the excess oil.  No need to season them again.

Enjoy them as a snack with your favorite natural soda or natural juice drink.   Give these to anyone at a party and you’ll see them flying off the plate.  There are restaurants here that serve these as appetizers even.

This is definitely not food for everyday…  this is a fried snack to eat sparingly.  But believe me, I make a batch of these before going to any street festival so that the smell of the real kind will not lure me in… trying to keep those temptations at bay…

And to all those Puerto Ricans out there… there’s no need to do without these Puerto Rican delicacies when you go vegetarian… 

Buen Provecho!

Fried Cauliflower

11 Jan

We already established I like fried foods, right?

But believe me, for the amount of fried foods I have posted on this blog, I do not eat that many of them… maybe like once a week, maybe. I think it’s just that we’re around the holidays here and these are “more or less” permissible things around the holidays… eat fried foods now, diet and exercise in the new year… But I find that if you exercise and eat healthy all the time, as part of your daily routine, you can indulge every once in a while in a fried morsel of crispy goodness.

Enough…

Here are my interpretation of Fried Cauliflower. I learned to eat this, believe it or not, at the salad bar at Ponderosa Steakhouse. The salad bars here in PR offer, in addition to the standard salad fare, corn sorullitos, macaroni and cheese, cooked corn, steamed carrots, and sometimes, fried cauliflower. They’re sooooo tasty. But the secret of their tastiness is in the batter. Let me show you how…

fried-cauliflower.jpg

FRIED CAULIFLOWER

1 head of cauliflower, cut in medium sized florets
2 cups whole wheat or spelt flour
2 tbs cornstarch
3 tbs sofrito
1 tbs salt or garlic salt
1 tbs Herbamare herbed salt
a few grinds of cracked black pepper
water – about 2 cups
a few sprinkles of paprika – optional
Canola oil – for frying
  1. In a medium bowl, mix the flour, cornstarch and the water. Mix the water slowly, maybe in two batches. The idea is for the batter to be the same consistency as pancake batter.
  2. Add to the batter, the sofrito, salt, herbed salt and pepper. Add paprika, if using.
  3. Heat about 1/2 inch of oil in a skillet over medium heat.
  4. Dunk the pieces of cauliflower in the batter. Clean the piece of any running batter and place carefully in the hot oil.
  5. Fry the little morsels until golden brown on all sides. It should take a few minutes – this way the cauliflower will cook/soften a bit and the batter will be golden brown and crunchy.

Eat on their own or dunk in Mayo Ketchup.

Hope you like them!!!

%d bloggers like this: