Basic Italian Tomato Pasta

30 Jul

I told you about the versatile and easy Tomato Italian Salad…  and here’s how you turn a salad into a meal.


BASIC ITALIAN TOMATO PASTA

1 recipe of Basic Tomato Italian Salad
½ package of pasta – I used kamut spaghetti, but I think it would work better with penne


  1. Bring a large pot with salted water to a boil.  Cook pasta according to the package directions until al dente.
  2. While the water boils and the pasta cooks, you prepare the Basic Tomato Italian Salad.  If you have some leftovers of this salad left from a previous night, just take it out of the fridge so it can come a bit to room temperature while the pasta cooks.
  3. When the pasta is done, drain it and combine with the Tomato/Mozarella mixture.

Broccoli Lasagna

29 Jul

Broccoli is in season, because it’s on sale in every supermarket I visit… the bunches looked so green and healthy I wanted to do something different with them.

Is lasagna something different Madelyn, really??  Well, it’s different for me because I have never done lasagna with broccoli before, but lasagnas are a big part of my dinner repertoire.  I used some inspiration from the delicious filling I did last year using broccoli and cauliflower.  Broccoli is on sale, Cauliflower not… so we are using broccoli alone on this one.


BROCCOLI LASAGNA

9 whole-wheat lasagna sheets
1 whole bunch of broccoli
1 tbs olive oil
¼ cup red onions, chopped finely
2 cups of milk
3 ounces of cream cheese
¼ cup parmesan cheese
1 cup Italian Blend shredded cheeses, divided in half
1/3 cup ricotta cheese
A pinch of red pepper flakes
½ cup of petite diced tomatoes
½ tsp Italian Seasonings
A drizzle of olive oil
2 tsps balsamic vinegar
Salt and Pepper to taste


It seems like a lot of ingredients, but let’s break it down so you can see it’s not that complicated…


  1. Prepare the broccoli by cutting up the florets into small pieces so they cook faster.  I also use the stems…  just peel the tough exterior and cut the stems very small so they will cook at the same time as the delicate florets.
  2. I use a steamer to boil the water for the pasta and steam the broccoli at the same time.  I set up the steamer with as much water as it can accommodate in the bottom.  I place the steamer on top and steam the broccoli until it is cooked completely and almost mushy.  This will take about 10-12 minutes.
  3. While the broccoli steams, we make the white sauce…  in a medium sized pan over medium heat add a bit of olive oil and the red onion.  Cook a few minutes to remove the raw taste.  Add the milk and the cream cheese and stir every so often to melt the cheese and start to thicken the sauce.  When the cream cheese is incorporated into the milk, add 1/2 cup of the Italian shredded cheeses, the parmesan cheese and remove from heat.  Whisk all together to melt and blend the cheeses and thicken the sauce.  Set aside.
  4. When the broccoli is done, take the steamer off and place the broccoli in a medium sized bowl.  Add the ricotta and season with salt, pepper and red pepper flakes.  Mash all the ingredients in bowl using a potato masher.  Set aside.
  5. Using the water still boiling from the steamer, add salt and boil the lasagna noodles for about 8-10 minutes.  I leave them slightly underdone so they do not break on me when assembling the lasagna.
  6. While the pasta cooks, season the diced tomatoes with salt, pepper, Italian Seasonings, drizzle of olive oil and balsamic vinegar.  Mix well and set aside.
  7. Now let’s assemble the lasagna…  In a 9” x 13” glass baking dish sprayed with olive oil spray, place some ladles of the white sauce to prevent anything from sticking.  Place 3 lasagna noodles at the bottom.  Add ½ of the broccoli mixture, add ½ of the diced tomatoes, add a few ladles of white sauce, and sprinkle about 1/3 of the shredded cheeses left.  And we start over again, another layer of noodles, the rest of the broccoli mixture, the rest of the tomatoes, more white sauce and shredded cheeses.  Lastly, top with the last layer of noodles, pour enough white sauce to cover the noodles and allow it to seep into the rest of the lasagna.  Finish off with the remaining shredded cheeses you may have left.
  8. Place the glass dish on a baking sheet to prevent any spilling in the oven and bake for about 30 minutes at 350F, until the filling/sauce is bubbling and the top gets golden brown. 
  9. Allow to cool for about 15 minutes before serving. 

Flat Out Flat Bread

26 Jul

Every time I find a great product I want to share it all with you…  This is the case with these Flat Out Flatbreads.  I saw them for the first time at Costco and even though I am not a fan of wraps, I liked the fact they were made with whole grains – 100% stone-ground whole wheat and flax seed.  So I decided to try them out.

These are FANTASTIC!!!  I use them as a quick and easy crust for pizzas all the time.  They are ready to go anytime and taste delicious.  I have made my Simpler Popeye Pizza on them… my Pizza Rosa…  regular tomato, cheese and basil pizza on them… and even a Hawaiian Pizza, as you can see right here.


I have only seen them at Costco in Puerto Rico, but I have seen them in Florida at Winn Dixies, etc.  So I am confident you’ll be able to find them in your local supermarket too.

My Favorite Travel Breakfasts…

23 Jul

You already know I love to travel.  You can certainly be aware of this by reading my previous posts on my recent visits to New York, Mexico, Paris, India, Miami…

And when I travel I get extra hungry, particularly for breakfast.  I can skip lunch; I can skip dinner… but I would never ever skip breakfast.  I am a sucker for big breakfasts and this is what I usually try to do:


Start with a fruit salad – Any fruit you like will do.  I try to stick to acid fruits together, like pineapple, grapes, strawberries.  And when I go for melons – watermelon, cantaloupe, honeydew – I try not to mix them with any other fruit.  I also like the papaya and mango combination, if available.  While in India recently, I enjoyed a lot papaya and pomegranate seeds… YUM!!

At home it’s difficult for me to make me a fruit salad,  that’s why I make myself smoothies from fresh fruits or fruits that I froze myself.  When I travel is simple to just serve yourself fruits that someone else cut for you…

 fruit-salad.jpg


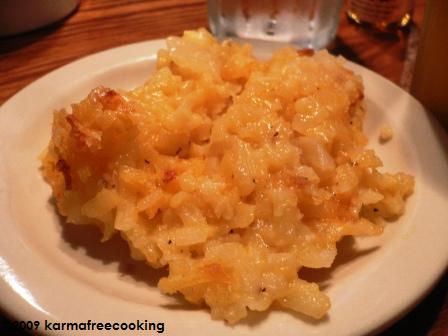
Follow with something more hearty – I like oatmeals, pancakes, breakfast potatoes, toasts,  etc.  A few of my favorite things to eat while I travel are:


And when I am traveling outside the US, I like to also try a few local things, even if they’re far removed from what I am used to having.  Like Chole Bhature or Dosas when I was traveling in India, “tacos al vapor” while in Guadalajara or croissants and tartines when in Paris… 

Include some kind of freshly squeezed Juice – Orange Juice is usually my favorite, but I can go for watermelon, grapefruit, apple or even vegetable juice… whatever is freshest and prettiest.


Hope that if you’re not an avid breakfast eater, this gives you a few ideas on what to try the next time you have the buffet in front of you… or inspire you to get adventurous to try interesting breakfasts when you are traveling…

Cherry Almond Clafouti

20 Jul

Cherries are not a tropical fruit… but I remember when I was little my dad used to buy us cherries whenever we traveled to NYC.  It was such a treat to sit and eat those deliciously sweet cherries…

Now, thanks to Costco, I have a huge bundle of sweet cherries in my fridge.  I sit and eat a small bowl watching TV but I wanted to do something special with them too.  The other day, reading Serious Eats we discussed how to best freeze cherries – if one should pit them before or after freezing them.  So after that discussion, I knew I decided to eat them raw or make them into something while fresh…

Then, last week, also in Serious Eats, we were asked to provide our French inspired recipes.  And you know me and my fascination of anything French… and with the abundance of fresh cherries in my fridge, I decided to make Cherry Almond Clafouti.  A clafouti is a French dessert where you take a pancake-like batter and pour it over fresh fruits and bake in the oven.

I’ll be honest… I’ve never eaten a cherry or any other clafouti in my life, partly because clafouti recipes out there all include eggs.  What I know about clafouti I have learned by watching TV and reading cooking recipes.  Alton Brown made a recipe the other day using a dutch oven and coals; Ina Garten has a few other recipes too.  So I decided to take what I liked about some of these, add a few little twists of my own… and this is what I ended up with.

This recipe makes a medium cherry clafouti  or two small ones – enough for 2 people.  Romatic, no?

CHERRY ALMOND CLAFOUTI

About 10 fresh cherries, pitted
¼ cup sliced almonds, toasted –  but you could also use peeled whole almonds
1½ tbs butter
½ cup soy milk, plus 2 tbs
1/3 cup spelt flour, sifted
1/8 cup brown sugar
1 ½ tsp egg replacer
1 tsp vanilla powder
A pinch of salt
  1. Pre-heat toaster oven to 350F
  2. Pit the cherries and set them aside.  I pitted them by smashing them lightly with the side of a knife.  Be careful the juice of the cherries doesn’t fall on your clothes.  They “spit” a bit when you smash them.
  3. Toast your almonds by placing them in a small tray and baking them  for about 10 minutes.  As soon as they start to smell like almonds, take them off the oven.  Set them aside to cool off a bit.
  4. Butter the inside of your baking dish.  I used a large ramekin for this…  but you could also use 2 smaller ramekins to serve as individual desserts.
  5. Prepare the egg replacer by mixing the egg replacer powder with 2 tbs of soy milk.  Set aside.
  6. Place the milk in a medium bowl, add the sugar and whisk well until the sugar has dissolved in the milk.  Add the egg replacer mix.  Whisk again to incorporate.  Place the flour onto a fine sieve and sift over the milk mixture.  Whisk well.  Add the salt and vanilla powder and whisk the whole mixture for a few minutes until well combined and air is incorporated into it.
  7. Place the cherries in the baking dish.  They should cover the whole bottom of the dish.  Add a few almonds to the cherries.  Pour almost the whole batter in top of the cherries, the batter should only cover them slightly.
  8. Bake in oven for about 30-35 minutes.  At the 15 minute mark, take them out slightly, place a few extra almonds on top and add a few small pieces on butter on top to make it golden brown.
  9. The clafoutis should be puffy and golden delicious.  Leave to cool about 30 minutes before serving.

This recipe is delicious… but I would like to work on it a little bit to perfect it.  I will definitely let you know of the results of those tastings soon.  I still have lots of cherries in that fridge…