Archive | main courses RSS feed for this section

“Chorizo” Pizza

18 Jun

In Spanish there’s a saying that goes… “Lo prometido es deuda.” which translates to “what you promise, you owe”. And I promised you I was going to gather for you the recipe for the winning pizza from the 1st Devanand pizza festival. After much pleading and almost begging, Yazmín, the creator of the winning delicacy, agreed to share her recipe with me and all of you, KarmaFree Cooking avid fans.

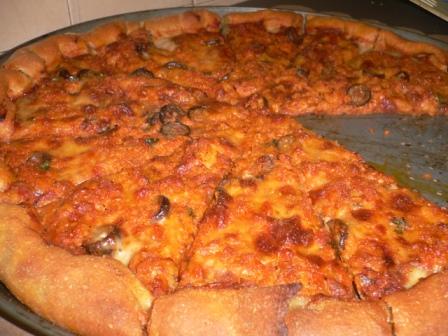
This winning “chorizo” pizza… and please notice the word chorizo is in quotation marks… because when I tried this pizza initially I was immediately transported to those pizzas they served at the movie theaters back in the day when double features were the norm. Do you remember too??? Or maybe even those pizzas they served at Woolworth in Plaza las Americas when I was a little girl. All you Puertorros out there can relate, right???

I believe, the connection of flavors to those memories is what made this pizza the winning pie at the festival. Among the judges were my mom and she certainly had tasted those pizzas of yesteryears I mentioned you from Cine Astor, Cine Martí and Woolworth. And ever since that day I was intrigued how Yazmín could capture that chorizo flavor… because the “chorizo” was as greasy and tasty as I remembered it.

I thought it was made from “soyrizo”… but when I actually bought it and tasted it, the taste as too prominent of cumin and I knew that wasn’t the flavor I had tasted on that delicious winning pizza. I thought then it was some sort of textured soy protein, but no, it wasn’t the same texture. Until one day I asked Yazmín directly and she revealed the “secret” to her “chorizo” – – VEGGIE HOT DOGS!!!! Veggie Hot Dogs cooked and seasoned with annatto oil to give them that greasy red orangey color of those chorizo pizzas I remembered.

I will admit… I have eaten this recipe many times after that pizza festival, but I have never ever made it myself. Hey, if Yazmín is my friend and she volunteers to make this each and every time our Guruji wants to eat some pizza, why in the world would I bother making it myself??? But I can assure you that if you have any questions at all about making this, I will relay all your messages to her and gather you the appropriate answers. We could even do a Twitter party if you all are up to it…

Gayatri, who helped make this “chorizo” pizza with her mom, Yazmin

I hope you all like this pizza… as much as I, my mom and the rest of the Yoga Center do. I think I might just call Yazmín right now to see when she will make another one of these real soon. I am getting a craving!!!!

“CHORIZO” PIZZA

Makes 2 large pizzas or 4 individual pizzas

 2 ¼ cups of All Purpose Baking Flour GF (Bob’s Red Mill) sifted and some more to work the dough
1 ¼ cups oatmeal flour gluten-free, sifted
¼ cup gluten substitute from Orgran
6 ¾ tsp xanthan gum
1 ¾ tsp sea salt
3 ½ tsp olive oil
3 ½ tspsapple cider vinegar
2 ¼ soy milk, warm
3 ½ tbs dry yeast
3 ½ tbs brown sugar
3 ½ tsp garlic poder
1 ¾ dry oregano
3 packets of organic cheese, shredded
 
 
Tomato Sauce
6oz of organic tomato paste
3 cups of water
1 tbs annatto oil
Salt
Garlic powder
Italian Seasonings 
Vegetable bouillon cube (optional)
 
Chorizo”
1 package of veggie hot dogs, finely grated
1 vegetable boullion cube
1 tbs water
Sea Salt
Garlic Powder
2-3 tbs annatto oil
  1.  Mix the flours, gluten substitute, xanthan gum, salt, garlic powder and oregano.
  2. In a glass jar mix gently the cup of warm milk, olive oil, sugar, vinegar and yeast. Allow to rest for about 5 minutes, or until you see the yeast start to bubble.
  3. In a stand mixer with the hook attachment on #2 speed, add the remaining warm milk, the yeast mixture and slowly start adding the flour mixture. Once in a while, scrape the sides of the mixing bowl to make sure it’s all well incorporated.
  4. Mix for a few minutes until you see the dough is getting elastic. Take the dough out of the mixer and transfer to a oiled glass bowl. Cover with plastic wrap and a towel. Place in a warm place in your kitchen for about 30 minutes to allow the dough to rise evenly.
  5. While we wait for the dough to rise, we make the tomato sauce and the “chorizo”…
  6. For the sauce, mix all the ingredients in a saucepan over medium heat. Mix together well and allow the vegetable bouillion cube to dissolve well, if using. Cook it for about 10-15 minutes until the sauce thickens. Set aside.
  7. For the chorizo, in another saucepan add the water and vegetable bouillon cube and dissolve well over medium high heat.
  8. Add the grated veggie hot dog and mix well.
  9. Add the annatto oil and season with the salt and garlic powder. Mix well and cook over the stove for a few minutes until the mixture becomes a homogeneous saucy concoction. Set aside.
  10. Pre-heat oven to 325F and grease two 16” pizza pans.
  11. Divide the dough in half and knead with your hands using some extra flour trying to make a ball. Now, flatten out with your hands and a rolling pin until you can cover the pizza pan with the dough. Place on top of pan and create a border by folding the edges a bit.
  12. Dock the center of the pizza dough with a fork. Brush extra olive oil over the dough.
  13. Place the sauce over the dough. Place some of the chorizo mixture over the sauce and top with a generous amount fo shredded cheese.
  14. Bake in oven for approximately 25 minutes, or until you see the cheese is melted and golden brown and the edges of dough are golden.

Quinoa Pilaf

6 Jun

I have never heard of quinoa until I met Diane Carlson a few years back. Diane is the wonderful chef behind the Conscious Gourmet culinary retreats and one of the founders of the Natural Gourmet Institute in NYC.

I took one of these culinary retreats once when they were still offered in Florida and it was one of the most wonderful experiences of my life. I still carry with me recipes and friendships from that retreat. And at that retreat was where I learned I could use a blog to share my recipes with all of you. So many good things came about from that retreat. I am thankful…

But this is not my recipe… This quinoa recipe is Diane’s recipe that has become my way of making quinoa ever since. I have made some tweaks to it by all the times I have made it, but I can’t take full credit for it. Diane taught me how to make quinoa and she should get the credit.

Now quinoa is all the rage. I hear its super popular way west in California. And us at the yoga center make it a lot too. The first time I bought quinoa was at Whole Foods right after finishing the retreat because I thought I would not be able to find it here in Puerto Rico. Now, I can buy it at Costco in 3 lbs bags. How things change, no??

QUINOA PILAF

1 cup quinoa, rinsed under cold water and drained well
1 ¾ cup vegetable broth
½ tsp salt
2 tbs olive oil
1 small onion, chopped finely
1 carrot, peeled and cut into very small pieces
1 rib of celery, chopped finely
½ red bell pepper, chopped finely
½ green bell pepper, chopped finely
½ cup peas, frozen works fine
Salt and Pepper to taste
¼ cup of chopped Italian flat-leaf parsley
  1. In a large pot, toast quinoa over medium-hi heat. Stir it occasionally until the grain is nearly dry. Then, stir constantly about 5 minutes more until it browns evenly and gets a nutty fragrance.
  2. Add the vegetable broth to the pot of quinoa. Add ½ tsp of salt and bring the pot to a boil. Once it starts boiling, lower the heat to simmer, cover and cook until quinoa is tender. That will take about 15-20 minutes.
  3. In the meantime, in a large skillet over medium-hi heat add the olive oil and the onions. When the onions have softened a bit, add the carrots and cook for a few more minutes. Add the celery, peppers and peas. Sauté for a few minutes until veggies are cooked tender but still somewhat crisp.
  4. By now the quinoa will be cooked. Add the vegetables to the pot of quinoa and mix well. Stir in parsley. Serve immediately.

I love making quinoa because it’s a grain full of protein and nutrients and it’s very easy to make. This is the basic pilaf recipe I learned to make, but I have made this with many other combinations of veggies. Just like rice, it’s a great vehicle to use those little odds and ends you have in your fridge… go crazy and tell me what’s your favorite combination.

Brown Rice with Corn – Quickie Version

1 Jun

Arroz con Maíz, or Rice with Corn, is a very typical Puerto Rican dish. My granddad loved it very much… it was something my grandma would fix for the family quite often.

The traditional way to make it is to cook the rice with tomato sauce, sofrito and the corn, all together. It’s traditionally made in a “caldero” or large pot, but as you know me, I can make it in a rice cooker. My grad school roommate, Michelle, was a big fan of my Arroz con Maíz. I used to make it for her and leave it in the rice cooker for her to eat when she was back from classes in the afternoon.

And even though making rice in a rice cooker is fairly simple… sometimes I don’t plan too much ahead to make food. I tend to go with what I am craving at the moment. For that same reason, I have developed a method to get almost the same flavors of the traditional Arroz con Maíz but in a quick easy way using left-over rice.

Brown Rice, as easy as it is to make in a rice cooker, it just takes time. It’s not something that you just pull together as easy as boiling some pasta or making a sandwich. To me, it’s very easy to just make a cup or two of plain brown rice in the morning, right after I am done with breakfast, and then by lunch time figure out what I can have with it. Sometimes I have made a quick stir-fry, sometimes I stuff some peppers… sometimes I make this quick Brown Rice with Corn recipe.

BROWN RICE with CORN – QUICKIE VERSION

2 cups of cooked brown rice
½ medium yellow onion, diced
1 tsp sofrito
1 cup frozen corn kernels
Olive Oil
Salt and Pepper to taste
Garlic Salt – optional
  1. In a large skillet over medium heat, drizzle a small amount of olive oil and add the sofrito and diced onions. Cook the onions for a few minutes until they begin to soften.
  2. Add the frozen corn kernels… no need to thaw then first. Just add them straight from the bag. Mix well with the onions so the corn cooks and the flavors mix. Season with salt and pepper, or the garlic salt if using. If you have a lid, cover the skillet and let the corn cook for a few minutes.

3.  Add the cooked rice to the skillet. Mix well and cover again. The steam in the skillet will soften the rice again if it’s hardened from being in the fridge. Allow cooking for a couple of minutes and turn the stove off and leave it there for the residual heat to finish heating the rice, making it fluffy again.

You’re done… now this is the perfect accompaniment to your favorite main course. I personally like to have it AS THE main course with a drizzle of ketchup on top and a salad on the side. Some sweet plantains or even some tostones – plantain or breadfruit – would work well with this too.

We came to show Eskimos how to make ice…

11 May

It’s incredible… how daring we are sometimes.

My friend Tania visited Paraguay for the first time about 6-7 years ago. During that first trip she learned from our Yoga friends over there how to make Eggplant Milanese using cornstarch and oatmeal as the breading. We all loved the fried eggplants when she first made them at the Yoga Center.

Flash forward to March 2012… here you have Yazmín and I making Eggplant Milanese in Paraguay. Not helping them make them… noooo, making them ourselves to treat everyone after our short retreat near Asunción.

How dare we come and cook something for them that they actually taught us how to make??? We are daring indeed…

Something I have learned over the years I’ve known how to make these Eggplant Milaneses:

  • No need to actually use a mandolin. They actually come out better when cut not as thin. After a nasty mandolin accident making these milaneses at home recently, I now cut them with a knife and they come out even better than with a mandolin even if they’re a tad uneven.
  • No need to marinate for a long time. Soy sauce is fine, but you can only marinate for about 30 minutes and you’ll be fine. A tad of sesame oil adds a nice twist too. And when they marinate less, your end up with a juicier fried eggplant.
  • Season the milk and the oatmeal very well before breading the eggplants. When the milk and the oatmeal are well-seasoned, it compensates for the short marinating time. Add generous amounts of powdered garlic, salt, paprika, pepper… your choices are endless.

I’ve been having cravings for these eggplants since I left Asunción. Time to run to the store and make some more…

Thanks Tania and the great cooks in Paraguay for their wonderful culinary inspiration always!!!!

Yucca and Soy Fritters

9 May

Paraguayans eat a lot of yucca… they call it mandioca and it’s a daily staple in their diet.

I was forewarned by my mom and other people who’ve been to the Yoga Center in Paraguay that I would have mandioca coming out of my ears by the end of our trip. To be honest… we ate mandioca in various ways, but I never felt overwhelmed by it.

One of my favorite ways to have yucca while we were in Paraguay was in a fritter form. Girl is Latin and we LOOOVE all things fried, no?

We made these as a form of karma yoga to help out an orphanage. My friend Ester and her husband help out this orphanage regularly and the organizer told them a few days prior that their pantry was empty and there are nothing for them to feed the kids with. So Ester and Ferreira rallied a few of us visiting them in Coronel Oviedo to help out the kids.  We made over 200 of these fritters… we only kept a few for ourselves and the rest was given to the kids.

They’re delicious. This is an adaptation of a local dish in Paraguay… the original name is in Guaraní, their native Paraguayan tongue. It’s traditionally made with ground beef but our version uses textured soy protein. The locals say the secret is in how you season it, because none of the non-vegetarians were able to tell the difference.

We did this recipe in very large scale as you will appreciate by the pictures… this is my scaled down version. You can certainly freeze the extra tortas and fry at a later occasion.  Thanks to Ester and Ferreira for the recipe…

YUCCA AND SOY FRITTERS

4 large yucca roots, peeled and scrubbed clean
1 cup of dry textured soy protein, soaked in 2 -3 cups of filtered water
1 green bell pepper, cut into pieces
1 red bell pepper, cut into pieces
1 bunch of scallions, roots removed and cut in thirds
8-10 garlic cloves, peeled
1 ½ cups of soy sauce
About 3-4 cups of fine cormeal flour
Canola Oil to fry the fritters in
  1. First we boil the yuccas… after the yucca pieces are well-peeled, cut, scrubbed clean making sure the inner core with the tough thread removed, you put them in a pot with plenty of salted water to boil.

We peeled and cooked a whole "saco" of mandioca...

2. Cover the pot while boiling and reduce the heat once it’s reached a rolling boiling point to prevent the bottom pieces from scorching. Boil the yucca pieces until they’re fork tender.

3. After the yucca is cooked, allow it to cool off and dry out a bit over clean kitchen cloths or towels.

4. While the yucca cooks we prepare the sofrito and the soy protein…

5. Using a hand grinder we make the sofrito by mixing the green and red peppers, the garlic cloves and the scallions. Using the hand grinder gives you a coarser texture than using a food processor. But if you don’t have a grinder, pulsing the veggies in your food processor will do just fine. Pulse until the mixture is well ground but not liquidy yet. Set aside.

6. The soy protein should be left to soak in the water for about 30 minutes. After it has soaked for that long and it’s now soft and tripled in size, drain and squeeze it dry. I use a fine mesh strainer and squeeze it using my fist. It does not have to be bone-dry, but it should not be wet and dripping.

7. Place the dried-out soy protein in a large bowl. Add about 1 cup of the sofrito mixture you created. Save any leftover unless it’s just a small amount and just add it up. Add the soy sauce to season and mix everything well. Set aside.

8. Now that the yucca has cooled off, we grind it using the hand grater. This is a labor of love, but you’ll be rewarded for your efforts afterwards. It’s not so bad doing a smaller batch like this one. But we made it for 200+ fritters and we had to take turns grinding yucca. So don’t be surprised with your arm hurts a bit afterwards.

9. After the yucca is ground, add it to the soy mixture. You can add it in batches while you’re grinding it. The yucca is very starchy and it’ll mix into the soy better if it’s just ground. The best way to mix this is using your very clean hands. Mix together the yucca and the soy until you have a homogeneous mixture that’s more yucca than soy.

10. Add about 1 cup of the fine cornmeal and mix well once again. We’re ready to make the fritters…

11. Prepare a tray with some cornmeal in the bottom. The mixture is sticky and the cornmeal will prevent them from sticking too much to the tray or your hands.

12. Using a generous amount of corn flour, create tennis-sized balls. Use plenty of corn flour… don’t be afraid to use it. After a ball is created, pat it into a patty. Set aside on the corn flour dusted tray. Keep making fritters until you run out of mixture.

13. In a large skillet filled with about 1 inch with oil over medium high heat, we fry the fritters. After you put them in, leave them until they develop a crust on one side. They’re soft and they’ll break apart if you move them around before once side if crispy. Sometimes it helps if you do not crowd the pan too much and if you spoon some of the hot oil over the fritter so that the top side hardens just a tad bit before flipping.

14. Flip them carefully using a spatula and fry golden brown on the other side.

15. Drain over a clean paper towel over a tray… wait a bit until they cool off to take a bite.

These fritters are a bit of a labor of love… but they’re well worth it. If you’re Paraguayan and know the name in Guaraní of this fritter, please share it with us in the comment section. GRACIAS!!!