Avocado Pasta

22 Sep

Avocado season is here…  and even though a few slices of avocado is the perfect accompaniment to any meal, and with so many ripening all at the same time, I’ve had to find creative ways to eat them all by myself…

This Avocado Pasta has become the last few weeks in my go-to lunch… it’s easy to make, mainly an assembly of flavors, because all you are cooking is the pasta.  Think of it like a pasta salad meets a guacamole and they decide to hang out together…  It’s refreshing because of the addition of the spearmint leaves.  Do not skip them… it’s partly what makes this dish special.  Trust… and your taste buds will be rewarded.

Recipe by KarmaFree Cooking


AVOCADO PASTA

2 cups uncooked pasta, I use gluten-free quinoa pasta

2 medium avocados, chopped

1 shallot, minced

15-20 grape tomatoes, halved

15 spearmint leaves and 5 extra ones, all julienned and separated

5-6 sprigs of flat-leaf parsley, chopped

The juice of 1 lime

3 large handfuls arugula

Extra Virgin Olive Oil

Garlic Salt

Salt and Pepper


  1. Cook by boiling your desired pasta in salty water according to the package directions…  I used quinoa pasta this time around.  I buy it at Costco.
  2. While the water boils and past cooks, prepare the avocado mixture – in a bowl mix together the avocados, shallot, lime juice, tomatoes, parsley, 15 spearmint leaves.  Season with olive oil, salt and pepper and toss well to combine the flavors.

Recipe by KarmaFree Cooking

3.  When the pasta is fully cooked, drain it well and add to the bowl where the avocados and tomatoes have been marinating.  Toss well to combine.  Add the arugula leaves, a light sprinkle of garlic salt and extra spearmint leaves and toss one final time to combine and for the arugula to wilt a bit.

Serve immediately.

Recipe by KarmaFree Cooking

Lau Lau

18 Sep

Lau Lau’s are leaves stuffed with sweet potatoes and steamed.  This is a very typical luau dish in Hawaii.  I have made plenty of times stuffed cabbage leaves (not to self…  share these recipes on the blog), but I have never worked with collard greens, as the recipes I found on the internet called for.   I was prepared to make this recipe with large kale leaves or even cabbage.  I was so pleased to see collard greens in the supermarket. Yay!!!!

Again… this recipe is not difficult at all.  It just has a few steps to it to ensure the end result looks and tastes as good as it can be.

I don’t know how large they make these in Hawaii…  but I had to cook for at least 40 people, and we had 10+ dishes for people to choose from, so I made them small.  I used half a collard green leaf for each lau lau packet.  If the leaf was small, I used one whole leaf.  You can certainly make them as large or as small as you wish.

The folding takes a little getting used to just until you figure out the best way to keep all the delicious sweet potato mash inside the green leaf.

Recipe from KarmaFree Cooking

LAU LAU

10-12 collard greens leaves

2 medium-sized white sweet potatoes, peeled and cut into 1-2 inch chunks

10 cremini mushrooms – chopped

2 cups frozen spinach, thawed and squeezed dry

1 large onion, chopped small

1 red bell pepper, chopped small

2 cloves garlic, chopped finely

1 vegetable bouillon cube

About ½ cup coconut milk

Olive oil

Salt and Freshly cracked Black Pepper

  1. In a medium saucepan, add sweet potato pieces and salted water to a boil.  Cook until they’re cooked and can be pierced easily with a fork.  Set aside leaving them in the cooking water to maintain warm.
  2. Fill a large but shallow pot with about 2 inches of water and bring to a boil.  Salt water heavily, as if you’re cooking pasta.  Place a few collard greens leaves at a time and cook for about 1-2 minutes or until slightly soft and color gets bright green.  Transfer to a bowl filled with salted ice water for leaves to cool and stop cooking.  This will also preserve the bright green color.  When leaves are cool, transfer to a plate lined with paper towels to drain.  Set aside.
  3. In a large skillet, drizzle a little olive oil and sauté onions, peppers, garlic with the vegetable bouillon cube.   Add cremini mushrooms and cook until they get a little color.  Add spinach and combine all the flavors together.  Season with salt and pepper one last time and set aside.
  4. In a large bowl, add the boiled sweet potatoes and mash them with a drizzle of olive oil.  Add the cooked mushrooms, spinach and veggies to the sweet potatoes and mash it all together.  Soften the mash by adding coconut milk.  Go little by little to make a soft mash.  Try not to add too much coconut milk or it might get soupy.
  5.  Pat dry the collard greens leaves.  Cut away the stem from each leaf.  I then cut each leaf, which are generally pretty large in half, along the same line where the stem used to be.
  6. Place about ¼ cup of mash in the bottom part of the leaf, leaving about 1 inch border, and roll it like you would a burrito…  fold bottom edge   of collard green over filling, fold in sides and roll away from you, creating as tight roll as possible.  Do this until you run out of leaves and/or filling mash.

At this point… you can save them to steam later or you can steam right away.  For the Hawaiian Festival, we rolled them the night before and steamed them the morning of our lunch festival.

  1. Set up a steamer pot with boiling water.  Transfer rolls to a steamer basket, cover pot and steam for 2-3 minutes.  Increase steaming time to 5 minutes if you made these in advance and are coming cold out of the fridge.  Transfer to serving platter carefully with tongs.

The collard greens are hearty, but are already tender enough that they cut easily.  The filling is sweet and savory.  This is great new way to enjoy cooked greens that still look vibrant green.

Image

Veggie Bites of Wisdom #56

16 Sep

Veggie Bites of Wisdom - KarmaFree Cooking

Taro Root Nests

14 Sep

I’m in love with taro root or malangas, as I call them on a daily basis…

Here is a fun and easy way to make taro root for your next party of gathering.

Taro Root Nests

TARO ROOT NESTS

1 pound of raw taro root, peeled and cut into long pieces
1 tsp sofrito
2 garlic cloves, peeled
1 tsp salt
A pinch of freshly cracked black pepper (optional)
Frying oil – canola oil, grape seed oil, vegetable oil, peanut oil, etc.
  1. Shred the taro root pieces using the shredding blade of your food processor.  You could also shred by hand using a box grater, but this would be much harder and take up more time.
  2. Transfer the shredded taro root to a large mixing bowl and season with the sofrito, salt and black pepper.  Grate the garlic cloves using a microplane grater over the shredded taro root mixture.  Combine well all the ingredients using your hands.  I find they work best for doing this.
  3. In a large skillet, add enough frying oil to make it about ½” to 1” deep and bring to temperature over medium-high heat.  The oil will be ready for frying when you stick the back of a wooden spoon into the oil and bubbles form all around it.
  4. Make mounds of the seasoned shredded taro root…  Squeeze out all the starchy liquid from it and place on the hot oil to fry.  Using a spoon, pour some of the hot oil over the mound of shredded taro root to help it cook on the inside and to start to harden the top part a bit.  Place mounds of taro root on the skillet leaving some space between the mounds so they don’t stick together.
  5. After a few minutes, flip the mound on the other side so it fries evenly on all sides.  When the taro root mounds are golden brown on all sides, take them off the oil using a wooden spoon and place them on a plate lined with paper towels to absorb all the excess oil.  If you want, you can sprinkle them lightly with some more kosher salt, but it may not be necessary.

Enjoy these little nest fritters as an appetizer or as the crispy component to any Latin dinner…

Colombian Breakfast Arepas

8 Sep

I’ve never been to Colombia…  YET.  But I have many Colombian friends who boast the deliciousness of their native cooking – Rubén, Andrew, Karina, Enrique, and my good friend, Dolly.  Whenever we visit our Yoga Center in Queens, she always wants to please our Guruji, and all of us who visit, with many of her Colombian favorite recipes.

Lately, she’s been making us her Colombian Arepas.   These arepas are made with yellow cornmeal and topped with your favorite veggie mixture.  We are busy yogis, so Dolly uses frozen pre-made arepas from La Venezolana, but there are many good brands out there.  Try to pick a brand that’s as natural as possible, with the least preservatives.

Here, I will share the recipe for the delicious topping…

Recipe by KarmaFree Cooking

COLOMBIAN BREAKFAST AREPAS with MIXED MUSHROOMS

4 corn arepas – the refrigerated kind

6 large white mushrooms, chopped finely

1/4 lb oyster mushrooms, chopped finely

1 yellow onion, chopped

½ red bell pepper, chopped

½ yellow bell pepper, chopped

2 roma tomatoes, chopped

2 tbs garlic and herb butter or use vegan butter if you prefer

2 sprigs of thyme, leaves only

¼ cup apple cider vinegar

2 tbs soy sauce

¼ cup wáter, if necessary to make a sauce

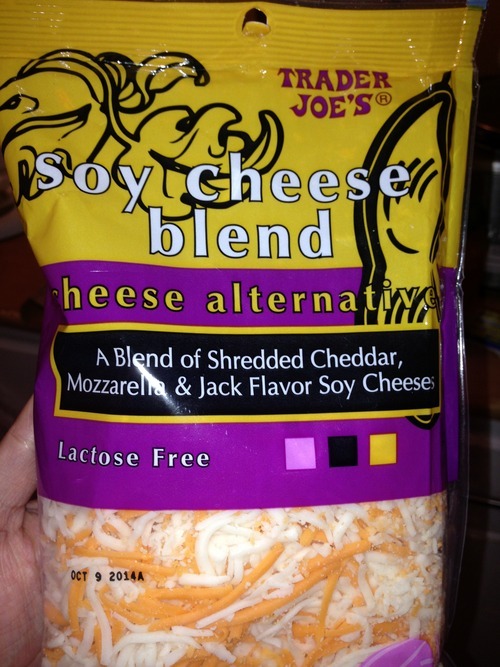
1 cup vegan shredded cheese – I used Trader’s Joe’s vegan cheddar/monterrey jack mix

Vegan mayonnaise

2 tbs Olive oil

Salt and Pepper to taste


  1. To thaw the arepas, place them in a 350F oven in a baking sheet covered with parchment paper… or place them on top of a griddle.  The oven is helpful because it can fit as many arepas as you want.  This recipe is good enough for 4 arepas, but it’s easily doubled if you need more for your crowd.
  2. In a large skillet over medium-high heat, drizzle a little bit of olive oil to the garlic/herb butter.  Add the mushrooms
  3. and toss them to coat them with the oil and butter.  Spread them out in the skillet so they can get browned.  Resist the urge to move them around.  Wait until the mushrooms start to give off the smell of a cooked steak…  I know…  I know…  but you’ll remember me when the smell hits your nose.  You might want to turn on the smoke extractor in your kitchen for this one…
  4. When you’re ready to move the mushrooms again, add the onions and peppers.  Season with salt and pepper and toss the whole contents of skillet so the onions and peppers cook.
  5. The arepas should be warm now in the oven… take them out, spread a generous schmear of vegan mayo and place about ¼ cup of shredded vegan cheese on top of each arepa.  Place back in the oven for a few minutes for the cheese to melt thoroughly.
  6. After a few minutes reduce the heat to medium, add the tomatoes and season with the thyme leaves.  After about 1-2 minutes, add the vinegar and soy sauce to start to create a sauce.  If the tomatoes do not give out too much liquid, add a little water to create a sauce.
  7. As soon as the cheese is melted and the mushrooms, onion, tomato mixture is cooked, you can assemble…  Place one arepa with melted cheese onto a plate and cover with a healthy helping, about ¼ of the mushroom mixture over it.  Serve alongside a simple green salad on the side.


I’ve had this dish originally as a hearty breakfast/brunch item… but I have also made it as a light dinner option.   Add a few slices of avocado, and you’ll be golden.  It’s easy to make and super filling.  Hope you enjoy ittoo…